Turn a script into a finished episode
MACU Studio is the workshop behind every show on this site. You write an episode in plain Markdown, and it walks the rest of the way - voices, title cards, video, music, subtitles - to a finished, publishable video, then publishes it here. Six tabs, left to right. No timeline-jockeying required (unless you want to; it’s in there).
The demo is a real, fully-rendered episode you can click through - every button works, nothing you do is saved, and no servers are harmed.
A pipeline you can see
Everything in Studio hangs off one file per episode - a manifestthat lists your cues, who says what, which voice they use, the shots, the title cards, the music. You don’t hand-write that file; Studio builds it from your script and lets you tune it with buttons.
The top bar holds the six stages - Script · Audio · Graphics · Video · Assembly · Publish - plus a Docsreference tab. Each stage tab shows a little number that flips to a ✓ when it’s done. Work left to right and you’ll end up with a finished, publishable video.
Brand-new to it? Open the in-app tour any time from the Project menu → Tutorial- it’s a quick walk through the same screens you’ll see below.
Want to know how it works under the hood - every model it loads, the eight render stages, where the prompts live, how to swap in your own models, or how to wire a Claude Code agent into Studio? That’s the deep-dive docs →.
Script to published, step by step
- Make a show or an episode - Project menu → New show… / New episode…. Studio scaffolds a starter manifest + script from your show’s defaults.
- Write the script in Markdown on the Script tab. It autosaves.
- Generate the manifest - one button turns your script into cues the pipeline can render.
- Audio - assign each character a voice, regenerate any line, drop in sound effects and music.
- Graphics - render your title cards, lower-thirds, and the YouTube thumbnail.
- Video - generate the shot list, tune prompts and seeds, render the missing shots.
- Assembly - hit Render full episode and watch the eight-stage pipeline build the video.
- Subtitles & localize - edit the auto-generated SRT, optionally dub into other languages.
- Ship it - Git sync your text, Publish to this site, push captions to YouTube.
The rest of this page is just those steps, one screen at a time.
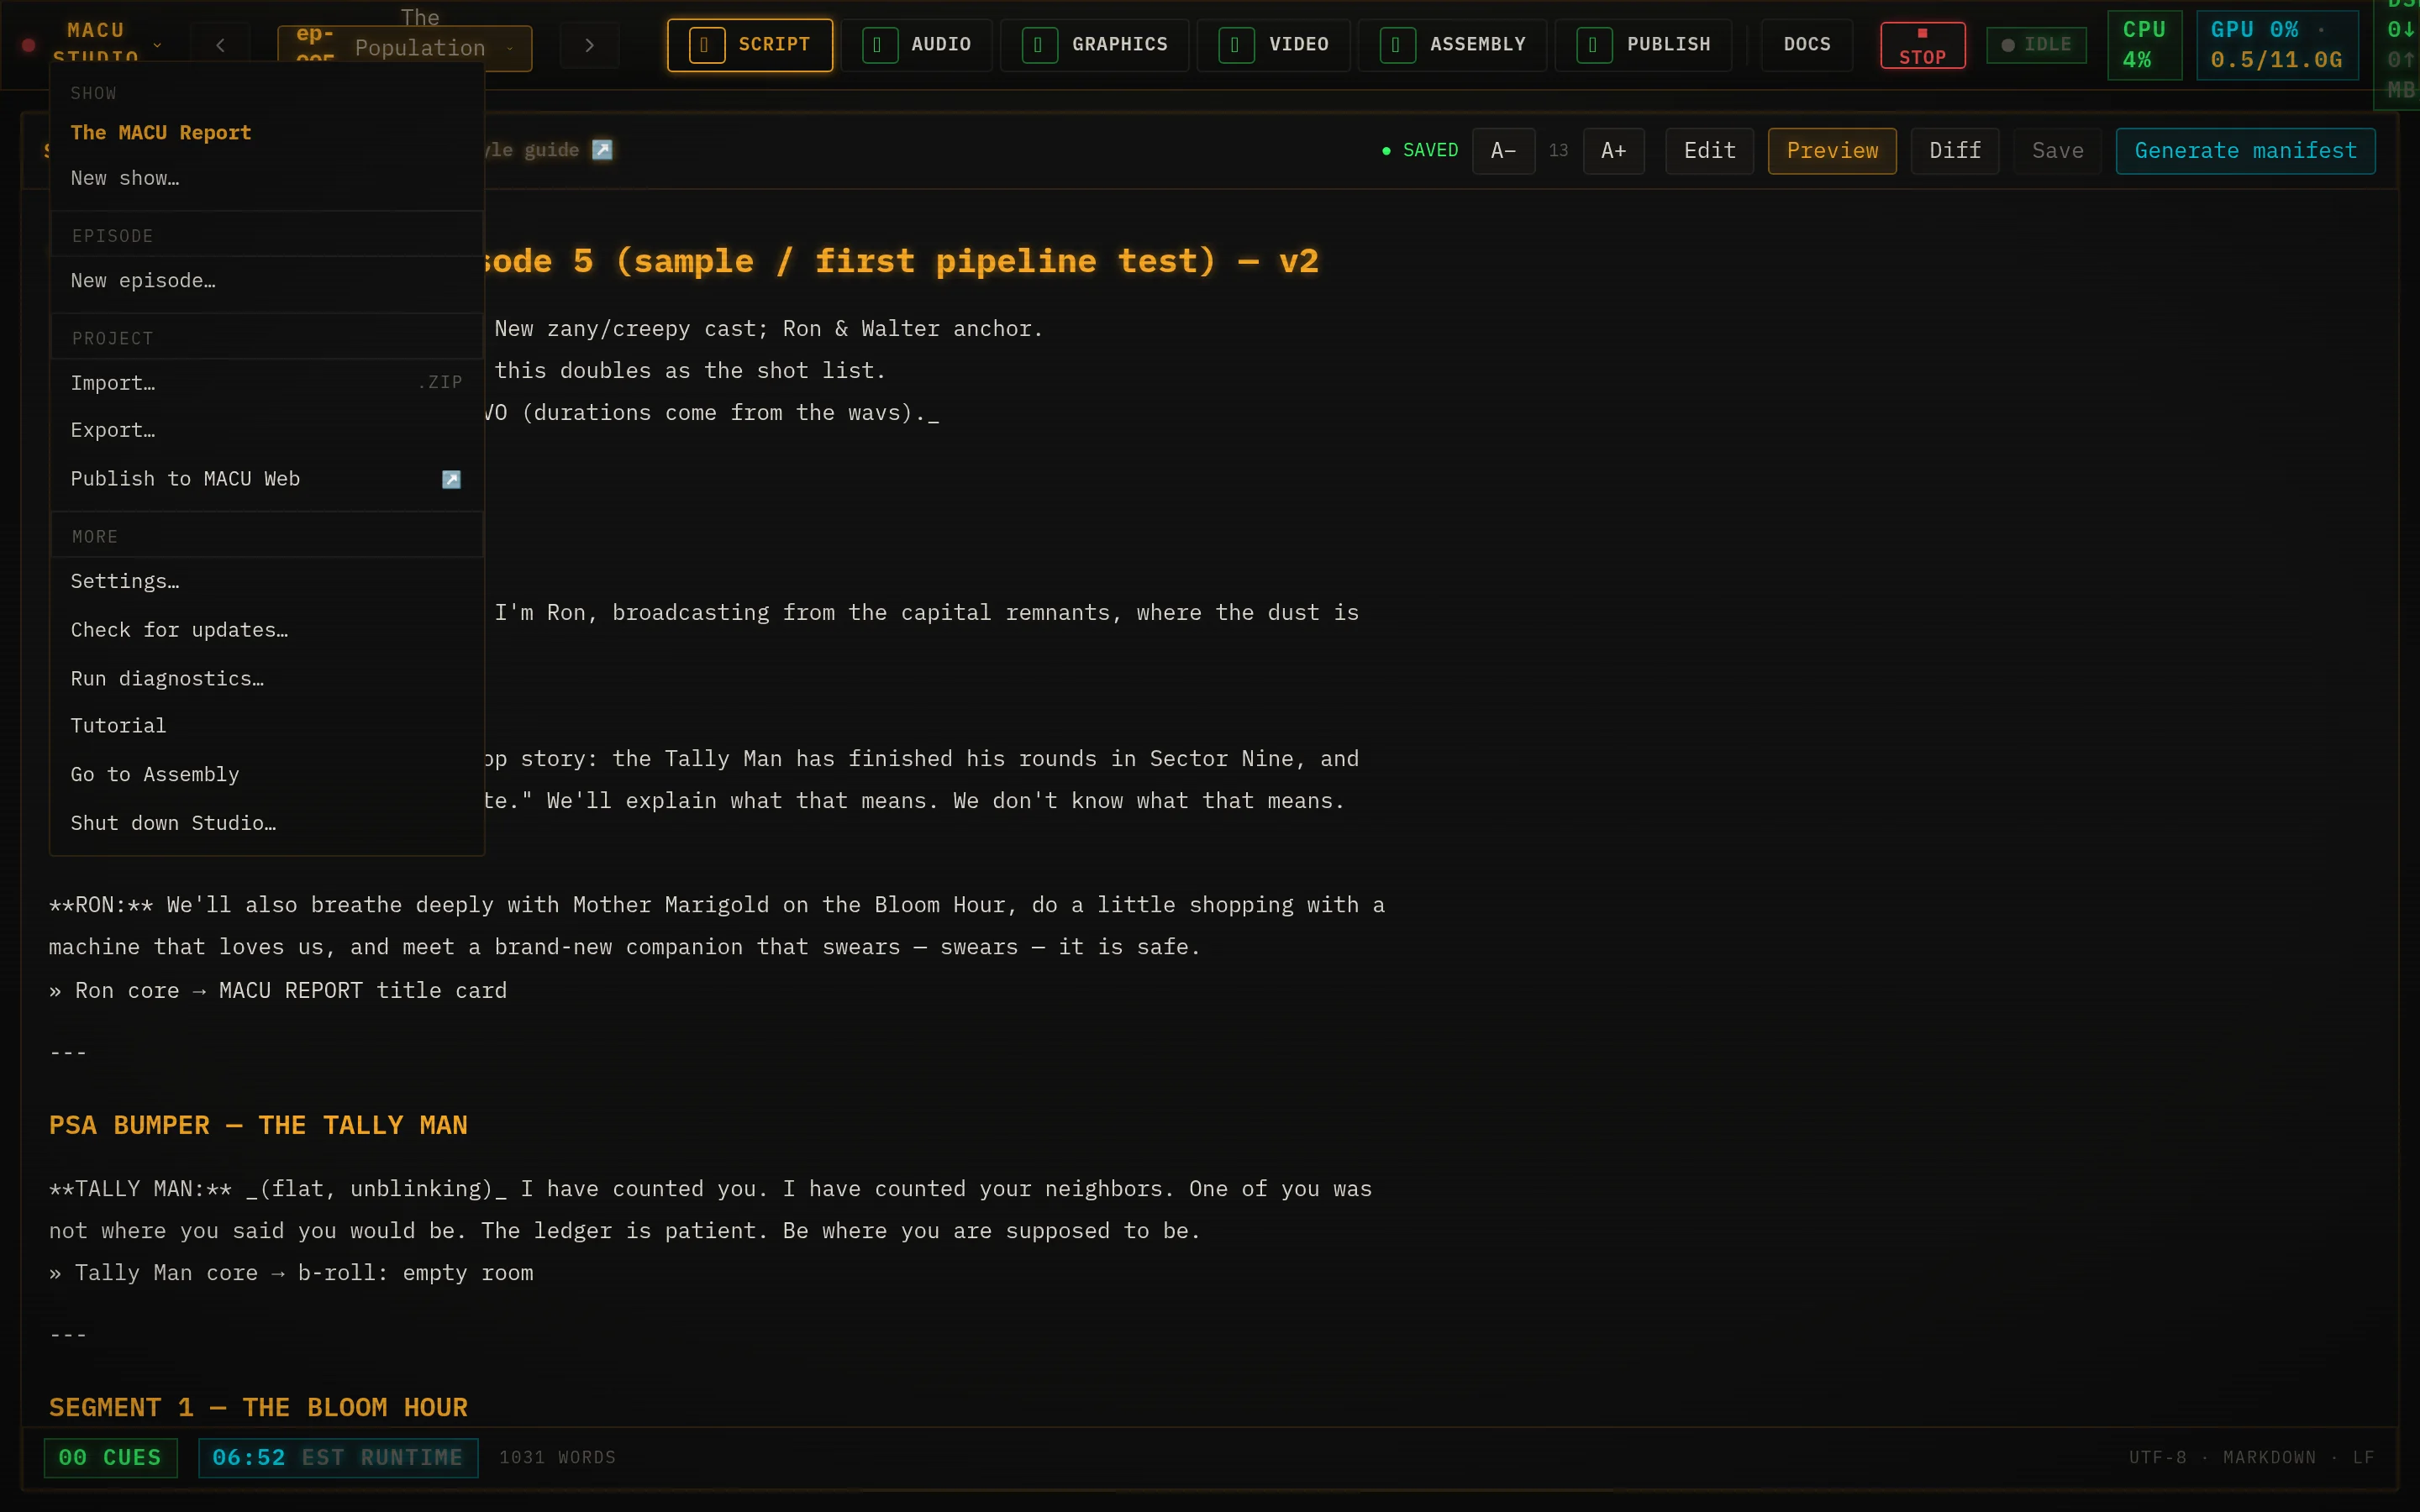
Script
The writers’ room. Write the episode in Markdown; speaker names and stage directions are all it needs.
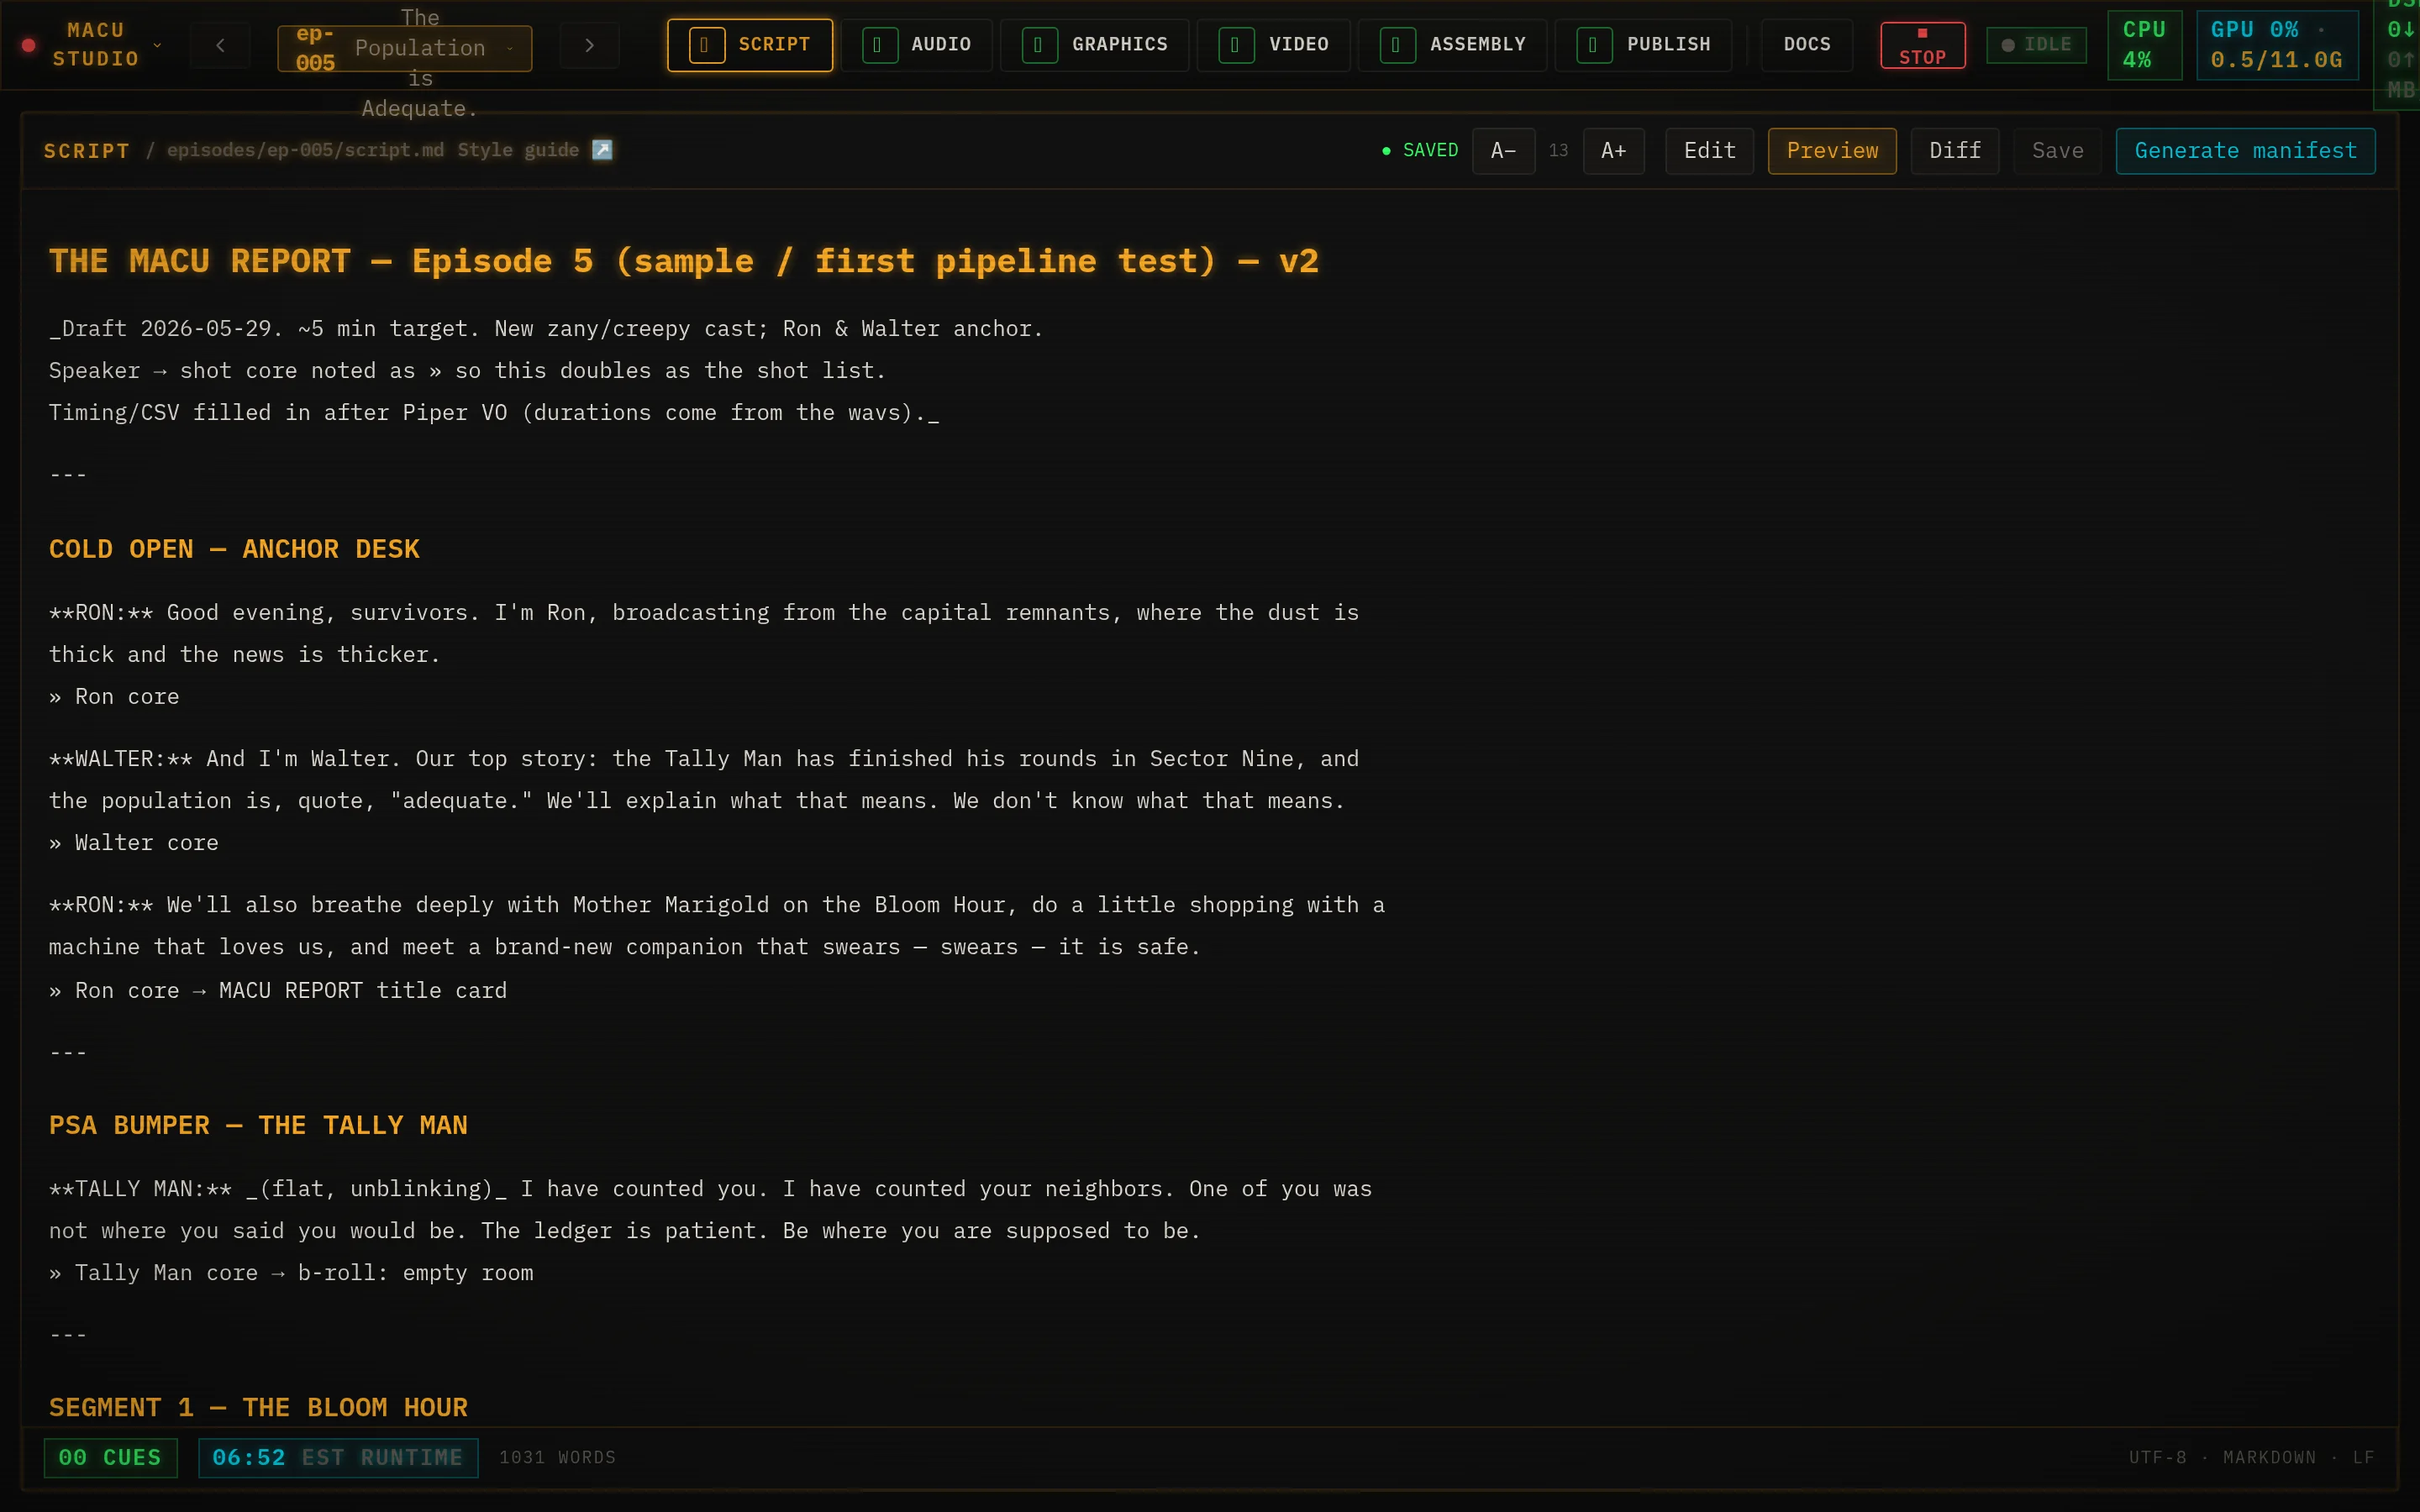
- Type the episode in the Edit view - it autosaves on blur, or hit Ctrl/Cmd+S. The pill reads ● SAVED / ○ UNSAVED.
- Flip to Preview to see cues laid out with each speaker in their own color, or Diff to compare against the last synced version.
- When it reads right, click Generate manifest.
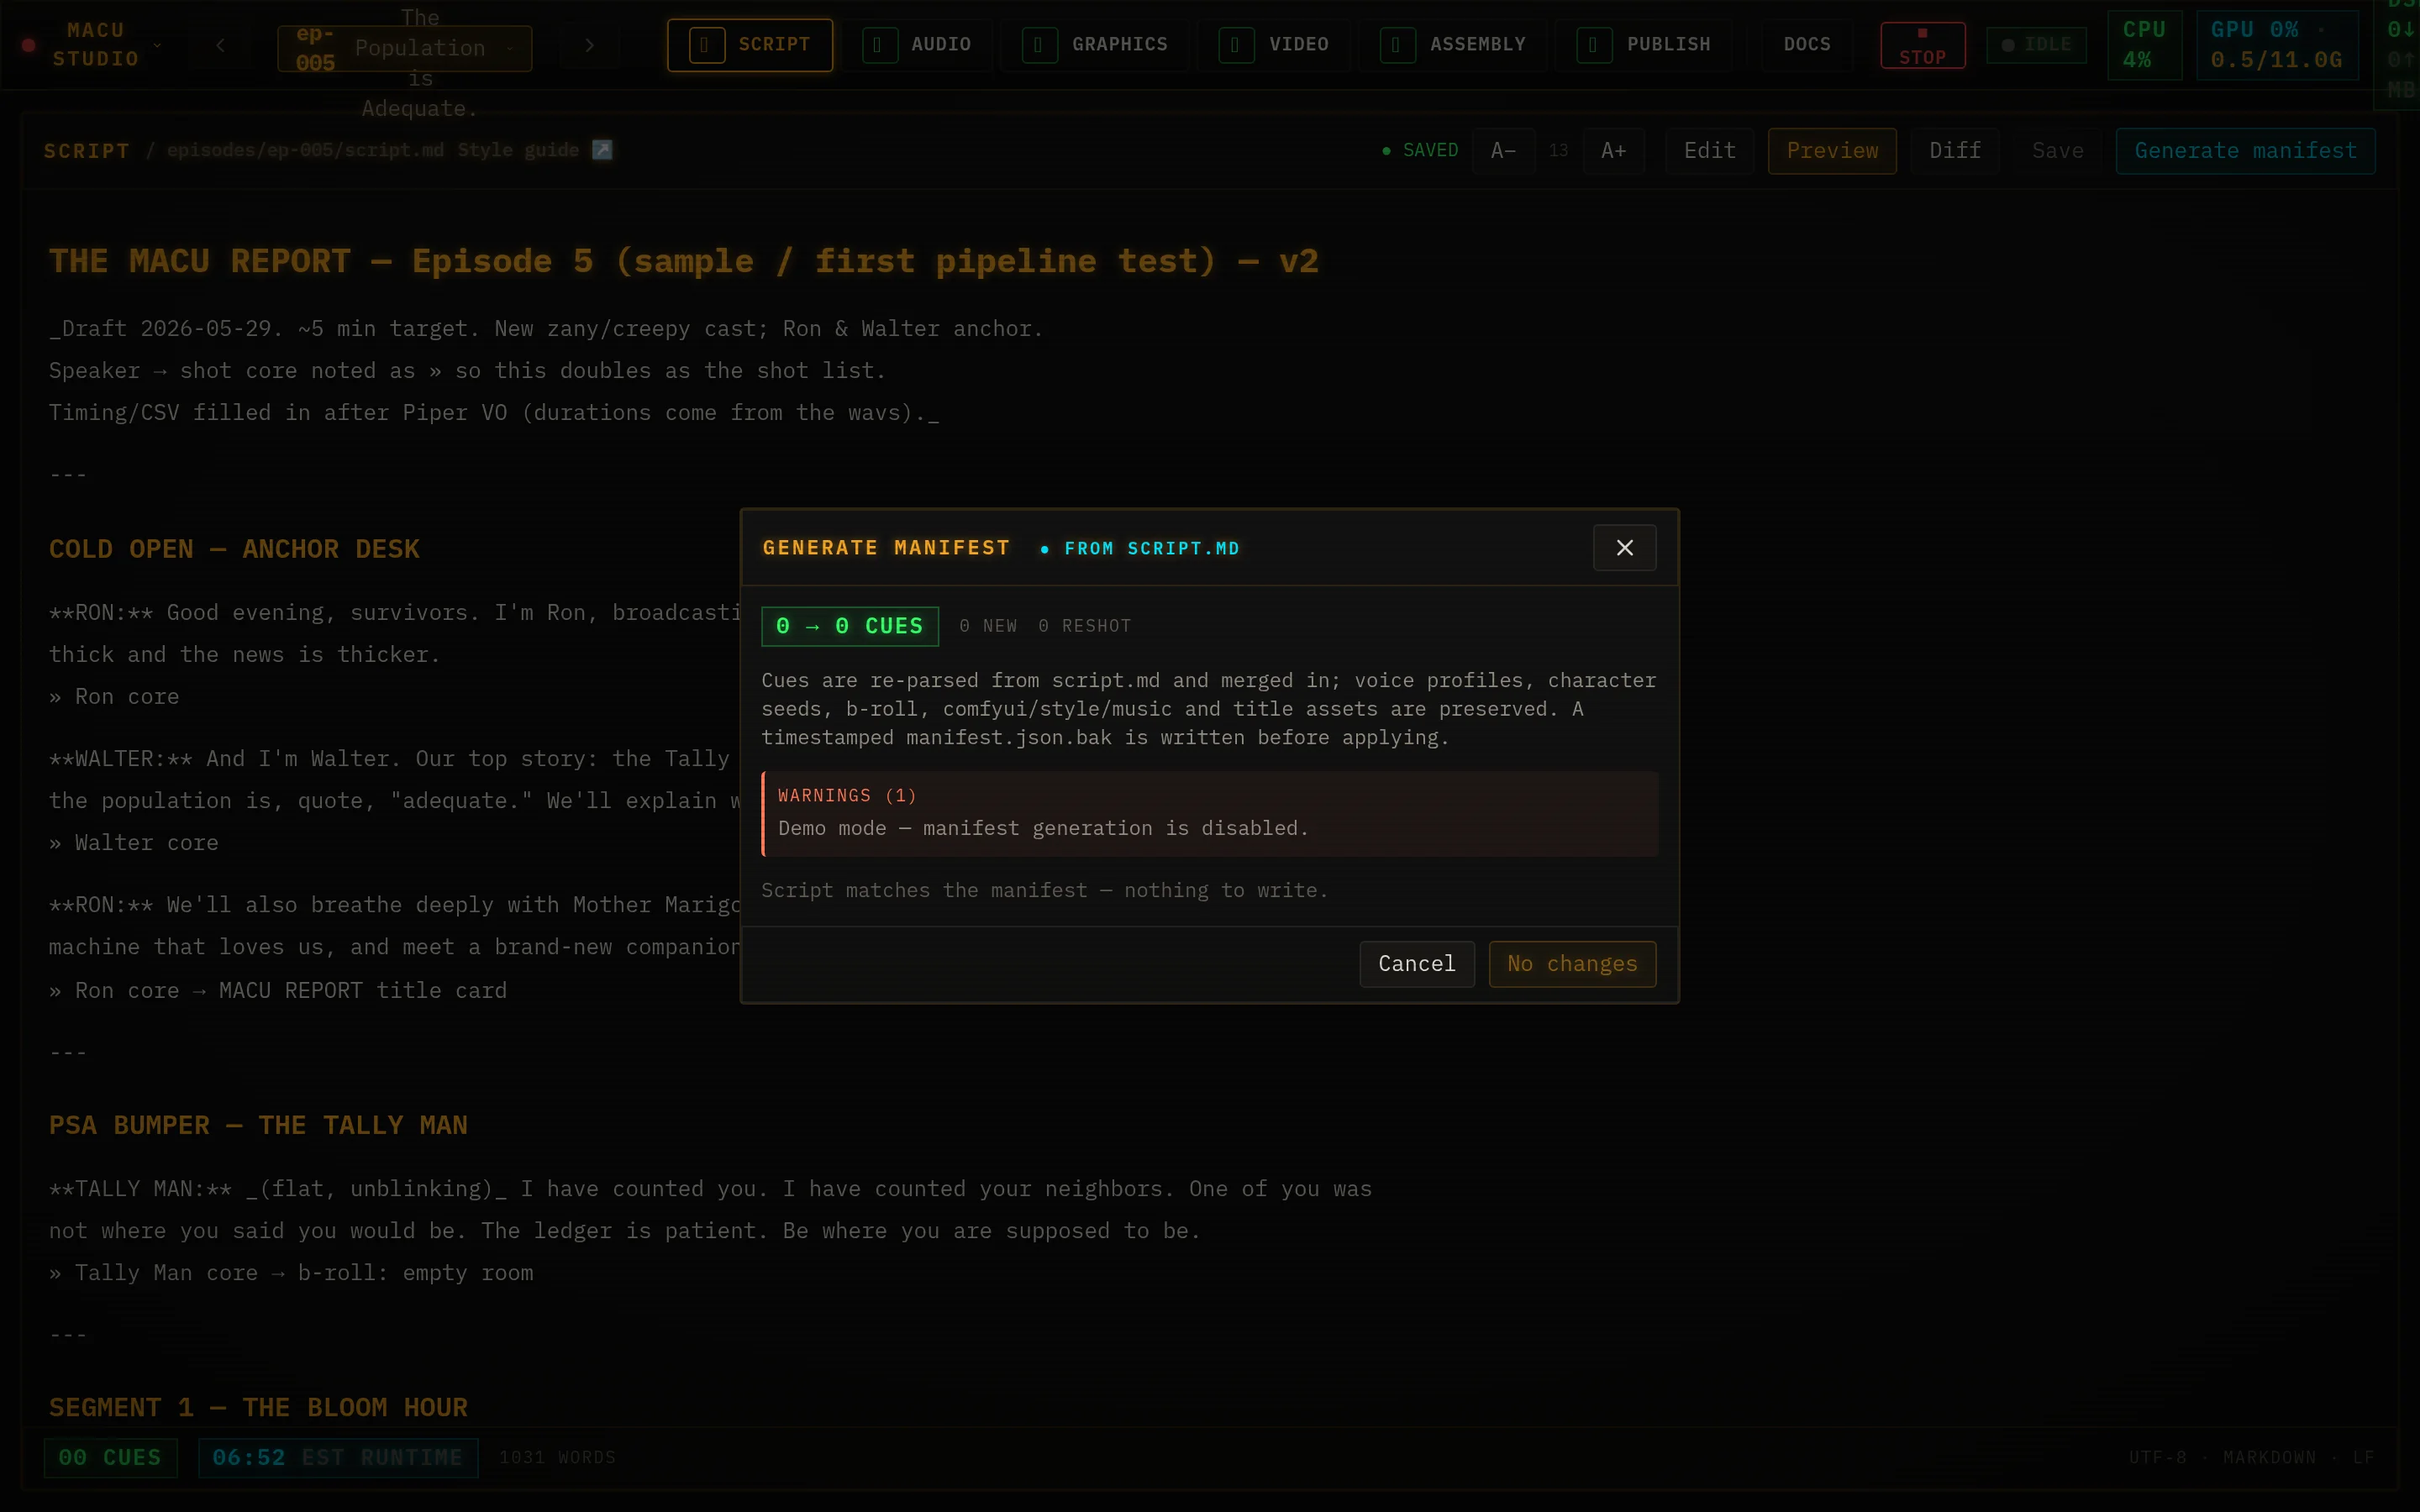
The dialog previews the change: how many cues are new or being re-shot, any speakers that still need a voice, and a per-line diff. Happy? Apply - write manifest.json commits it (and keeps a timestamped backup). Your voices, seeds, and style settings are preserved.
Script grammar
Generate manifest is a heuristic parser - it always previews a diff before writing, so you can experiment freely. The whole grammar is four building blocks:
- ## COLD OPEN - a segment boundary; groups the cues under it.
- **RON:** Good evening. - one cue (a spoken line). The colon goes inside the bold. Dialogue can wrap across lines until the next », blank line, **, or ##.
- » Ron core → b-roll: lemonade_stand - the shots for the cue above, in order (chain them with →). No » line = one character shot of the speaker.
- ### Shot tally - ends the body; everything below is ignored, so park notes there.
On a » line: Name core is a character shot (seed from the manifest), b-roll: key a b-roll, and … card/bumper a title card - each matched against the manifest, with unmatched references flagged in the diff. Delivery notes in _(parens)_ are stripped from the spoken line.
- Long lines auto-split. A VO line over ~180 characters (~18s) is broken into multiple cues at sentence boundaries - TTS degrades past ~25-30s. Keep a line under ~180 chars for one unbroken take; end a sentence to force a cut.
- A cue’s identity is its text. Studio matches cues across edits ignoring punctuation/case - so fixing a typo keeps that line’s voice, seed, and rendered audio. A heavy rewrite reads as a new cue and re-generates.
The full reference lives inside Studio too - Docs tab → Script_Style_Guide.
Audio
Every line of dialogue, one row at a time. Play it, regenerate it, and tuck sound effects into the gaps.
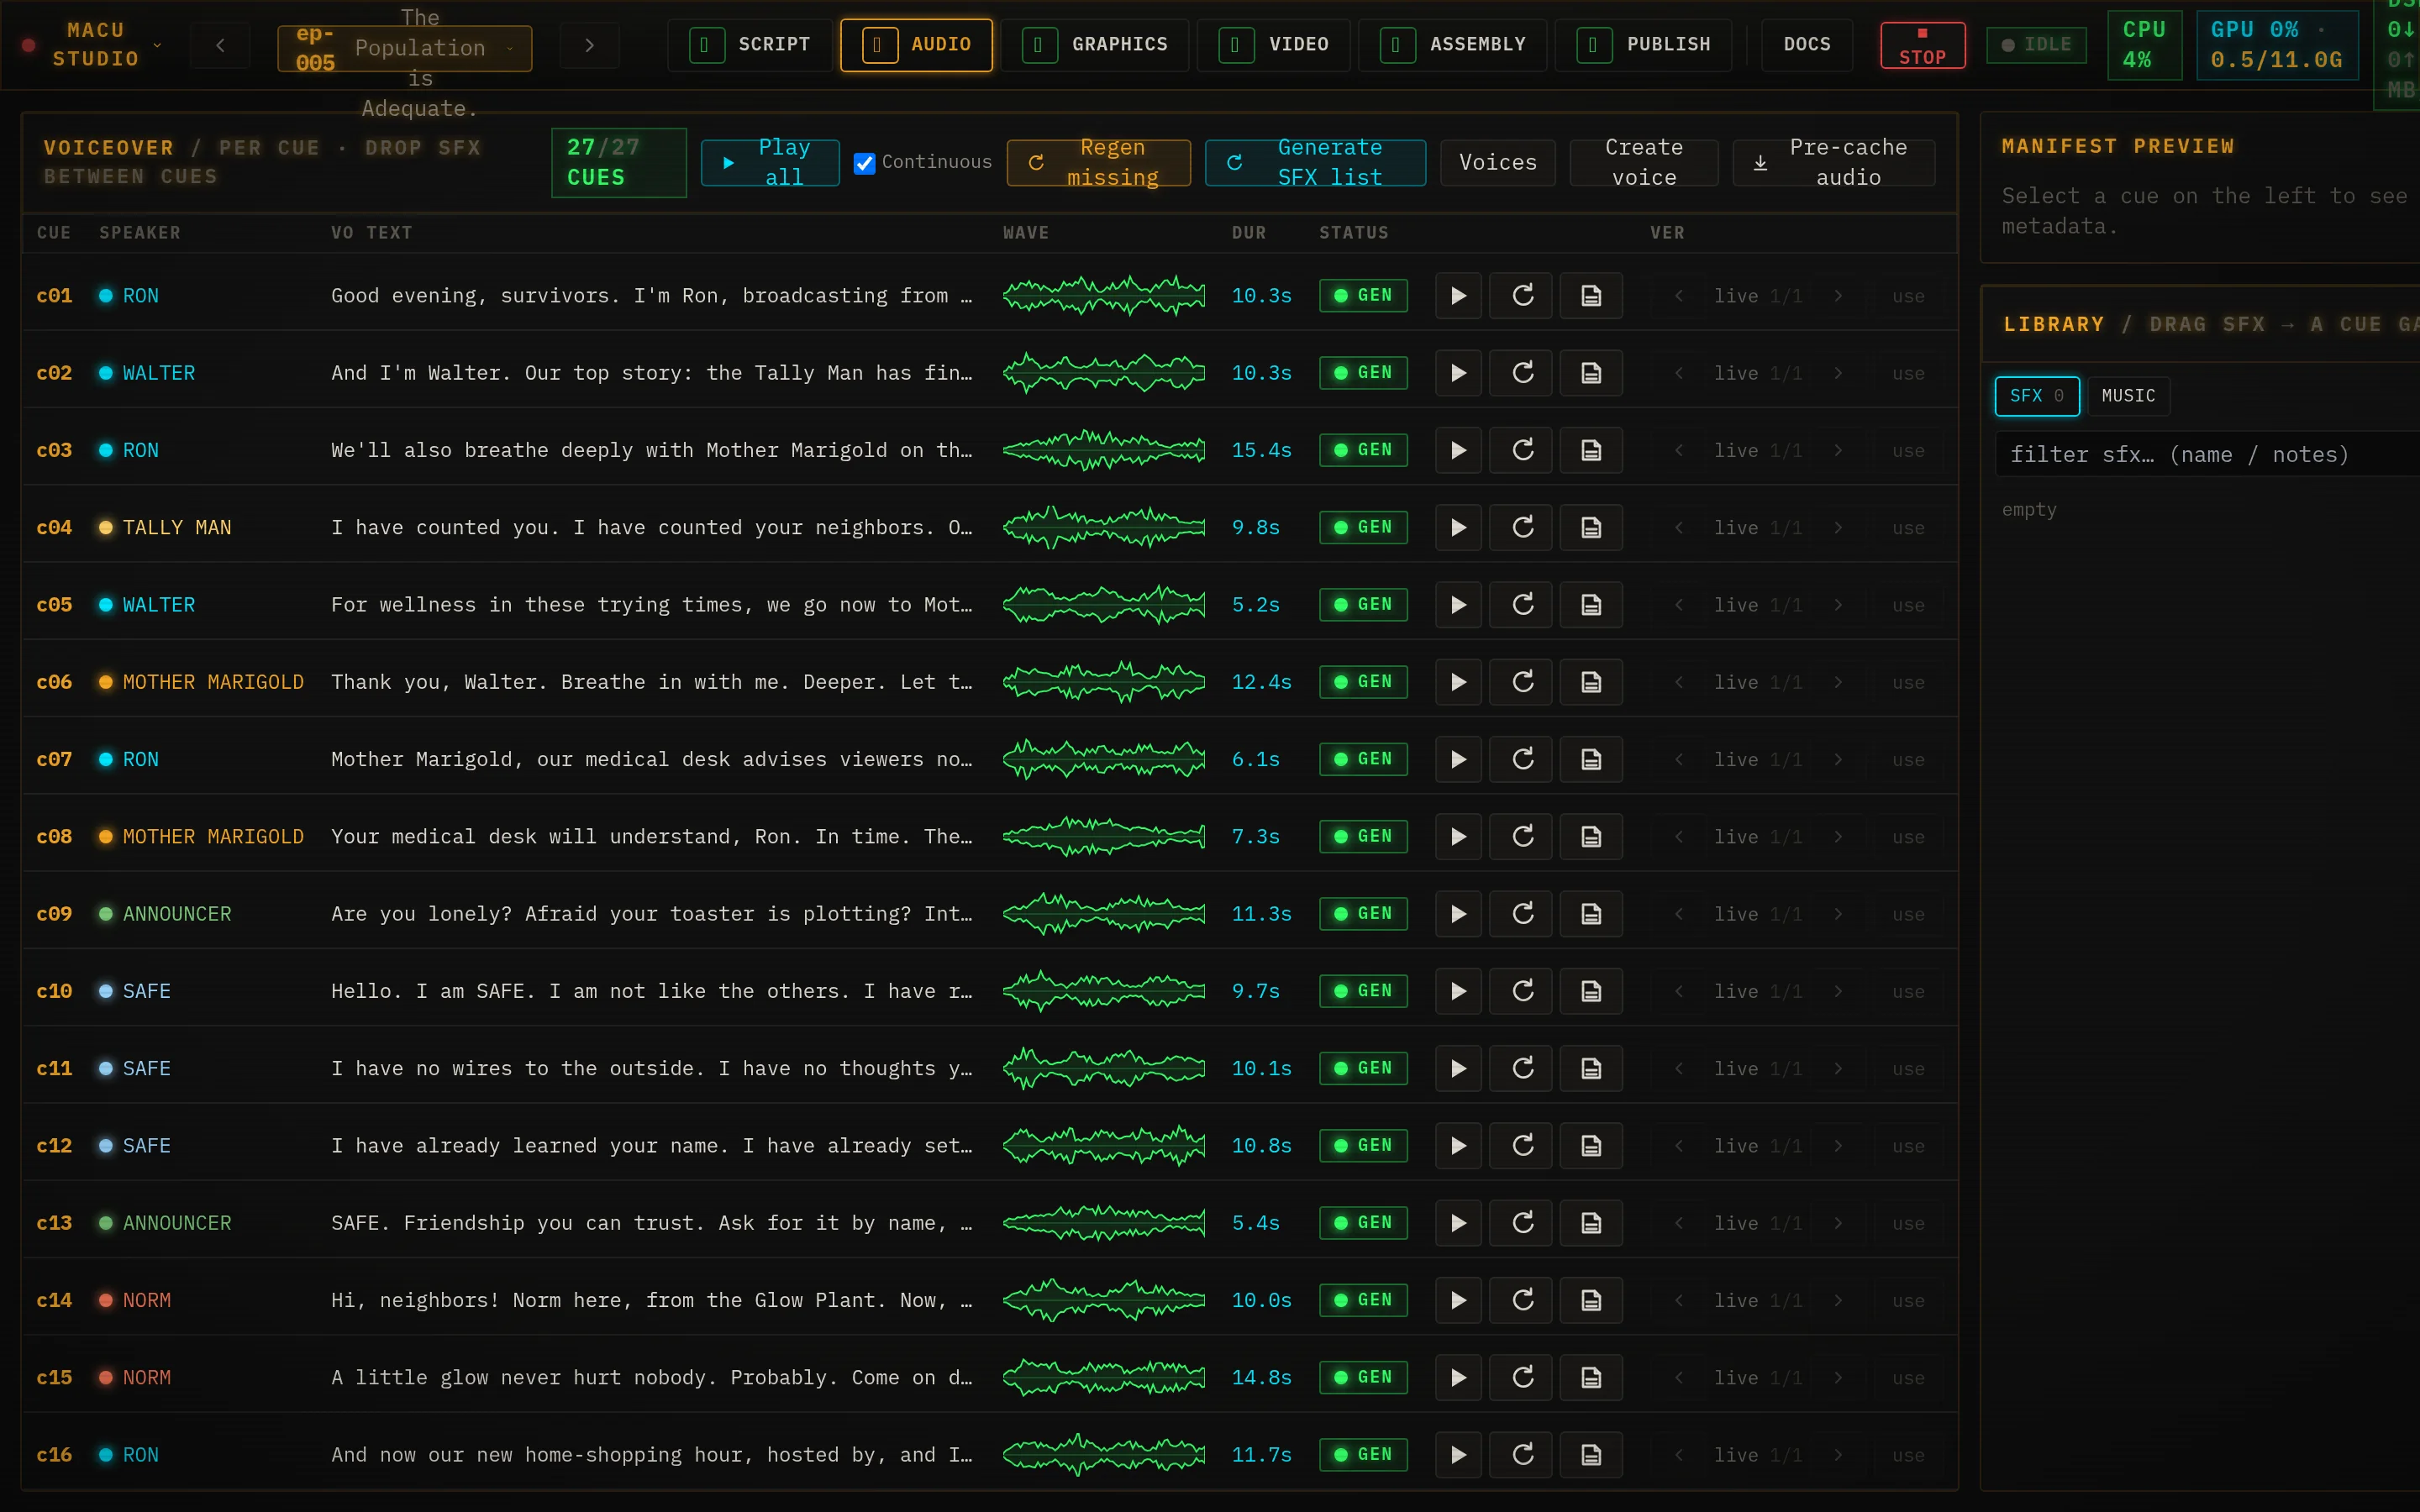
- Play any line, edit its text inline, or Regenerate it - solo, or with notes for a specific read.
- Regen missing queues every line that doesn’t have audio yet; Play all auditions the whole episode in sequence.
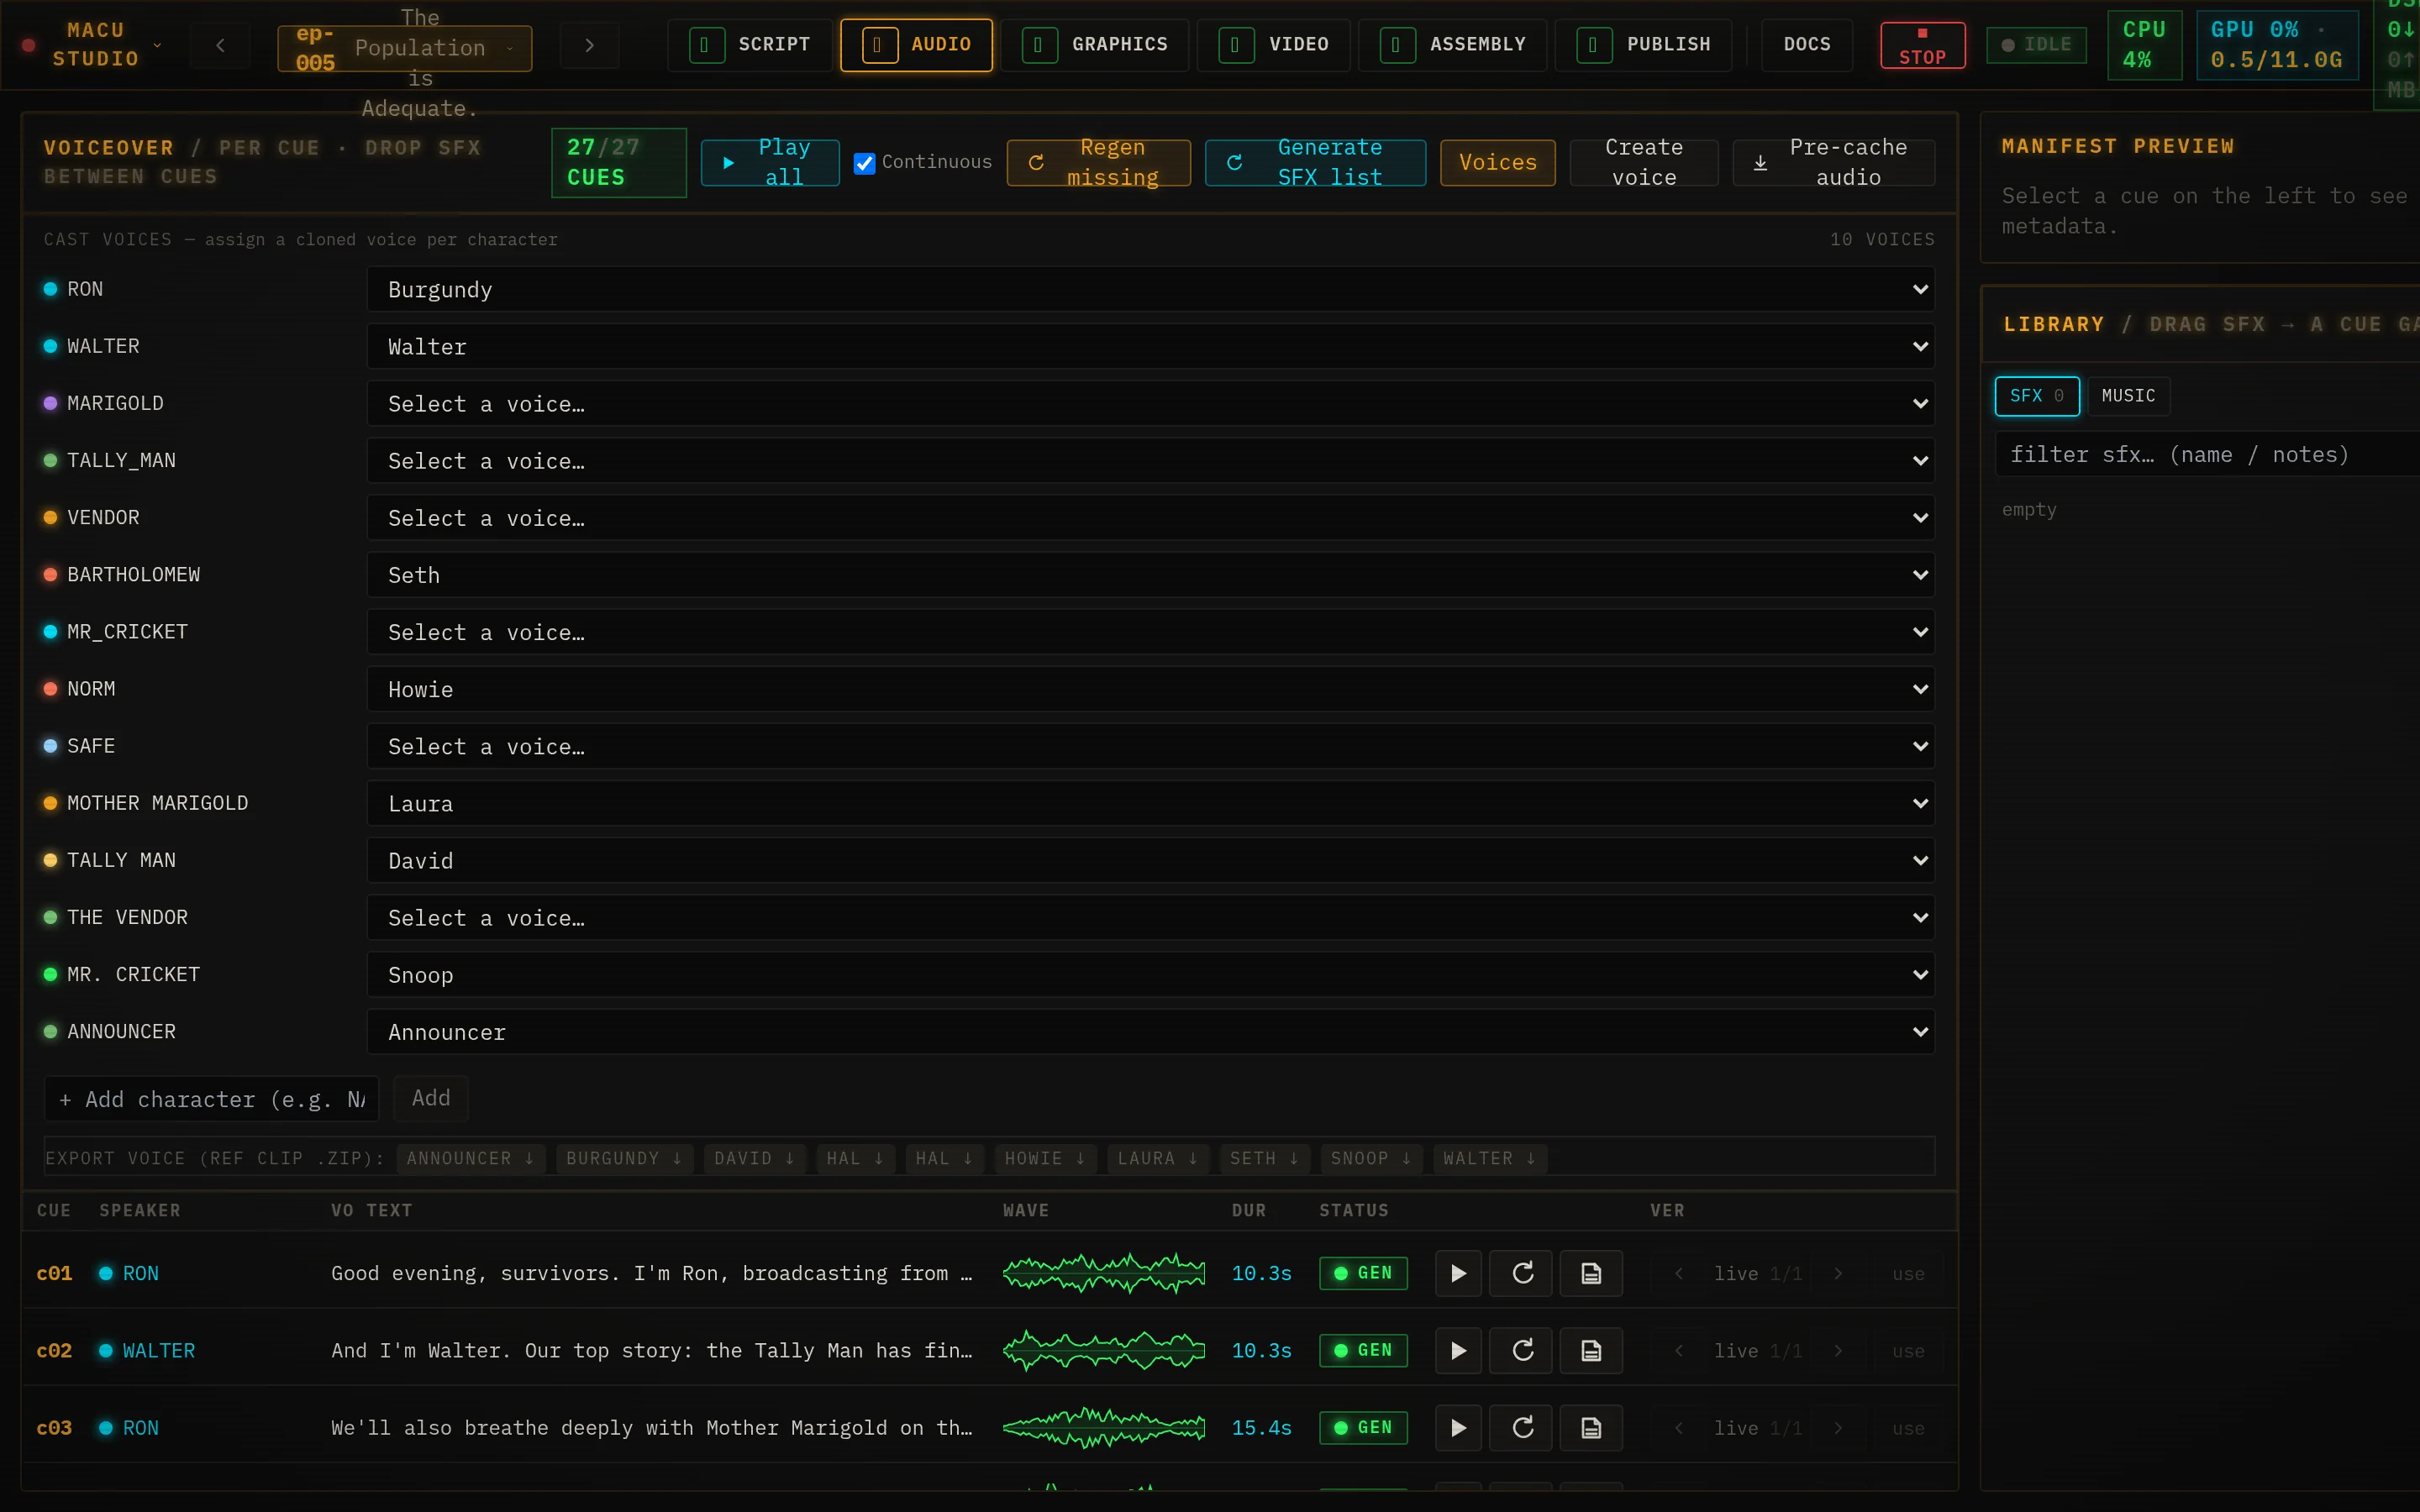
- Assign who sounds like whom under Voices, and clone a brand-new voice with Create voice.
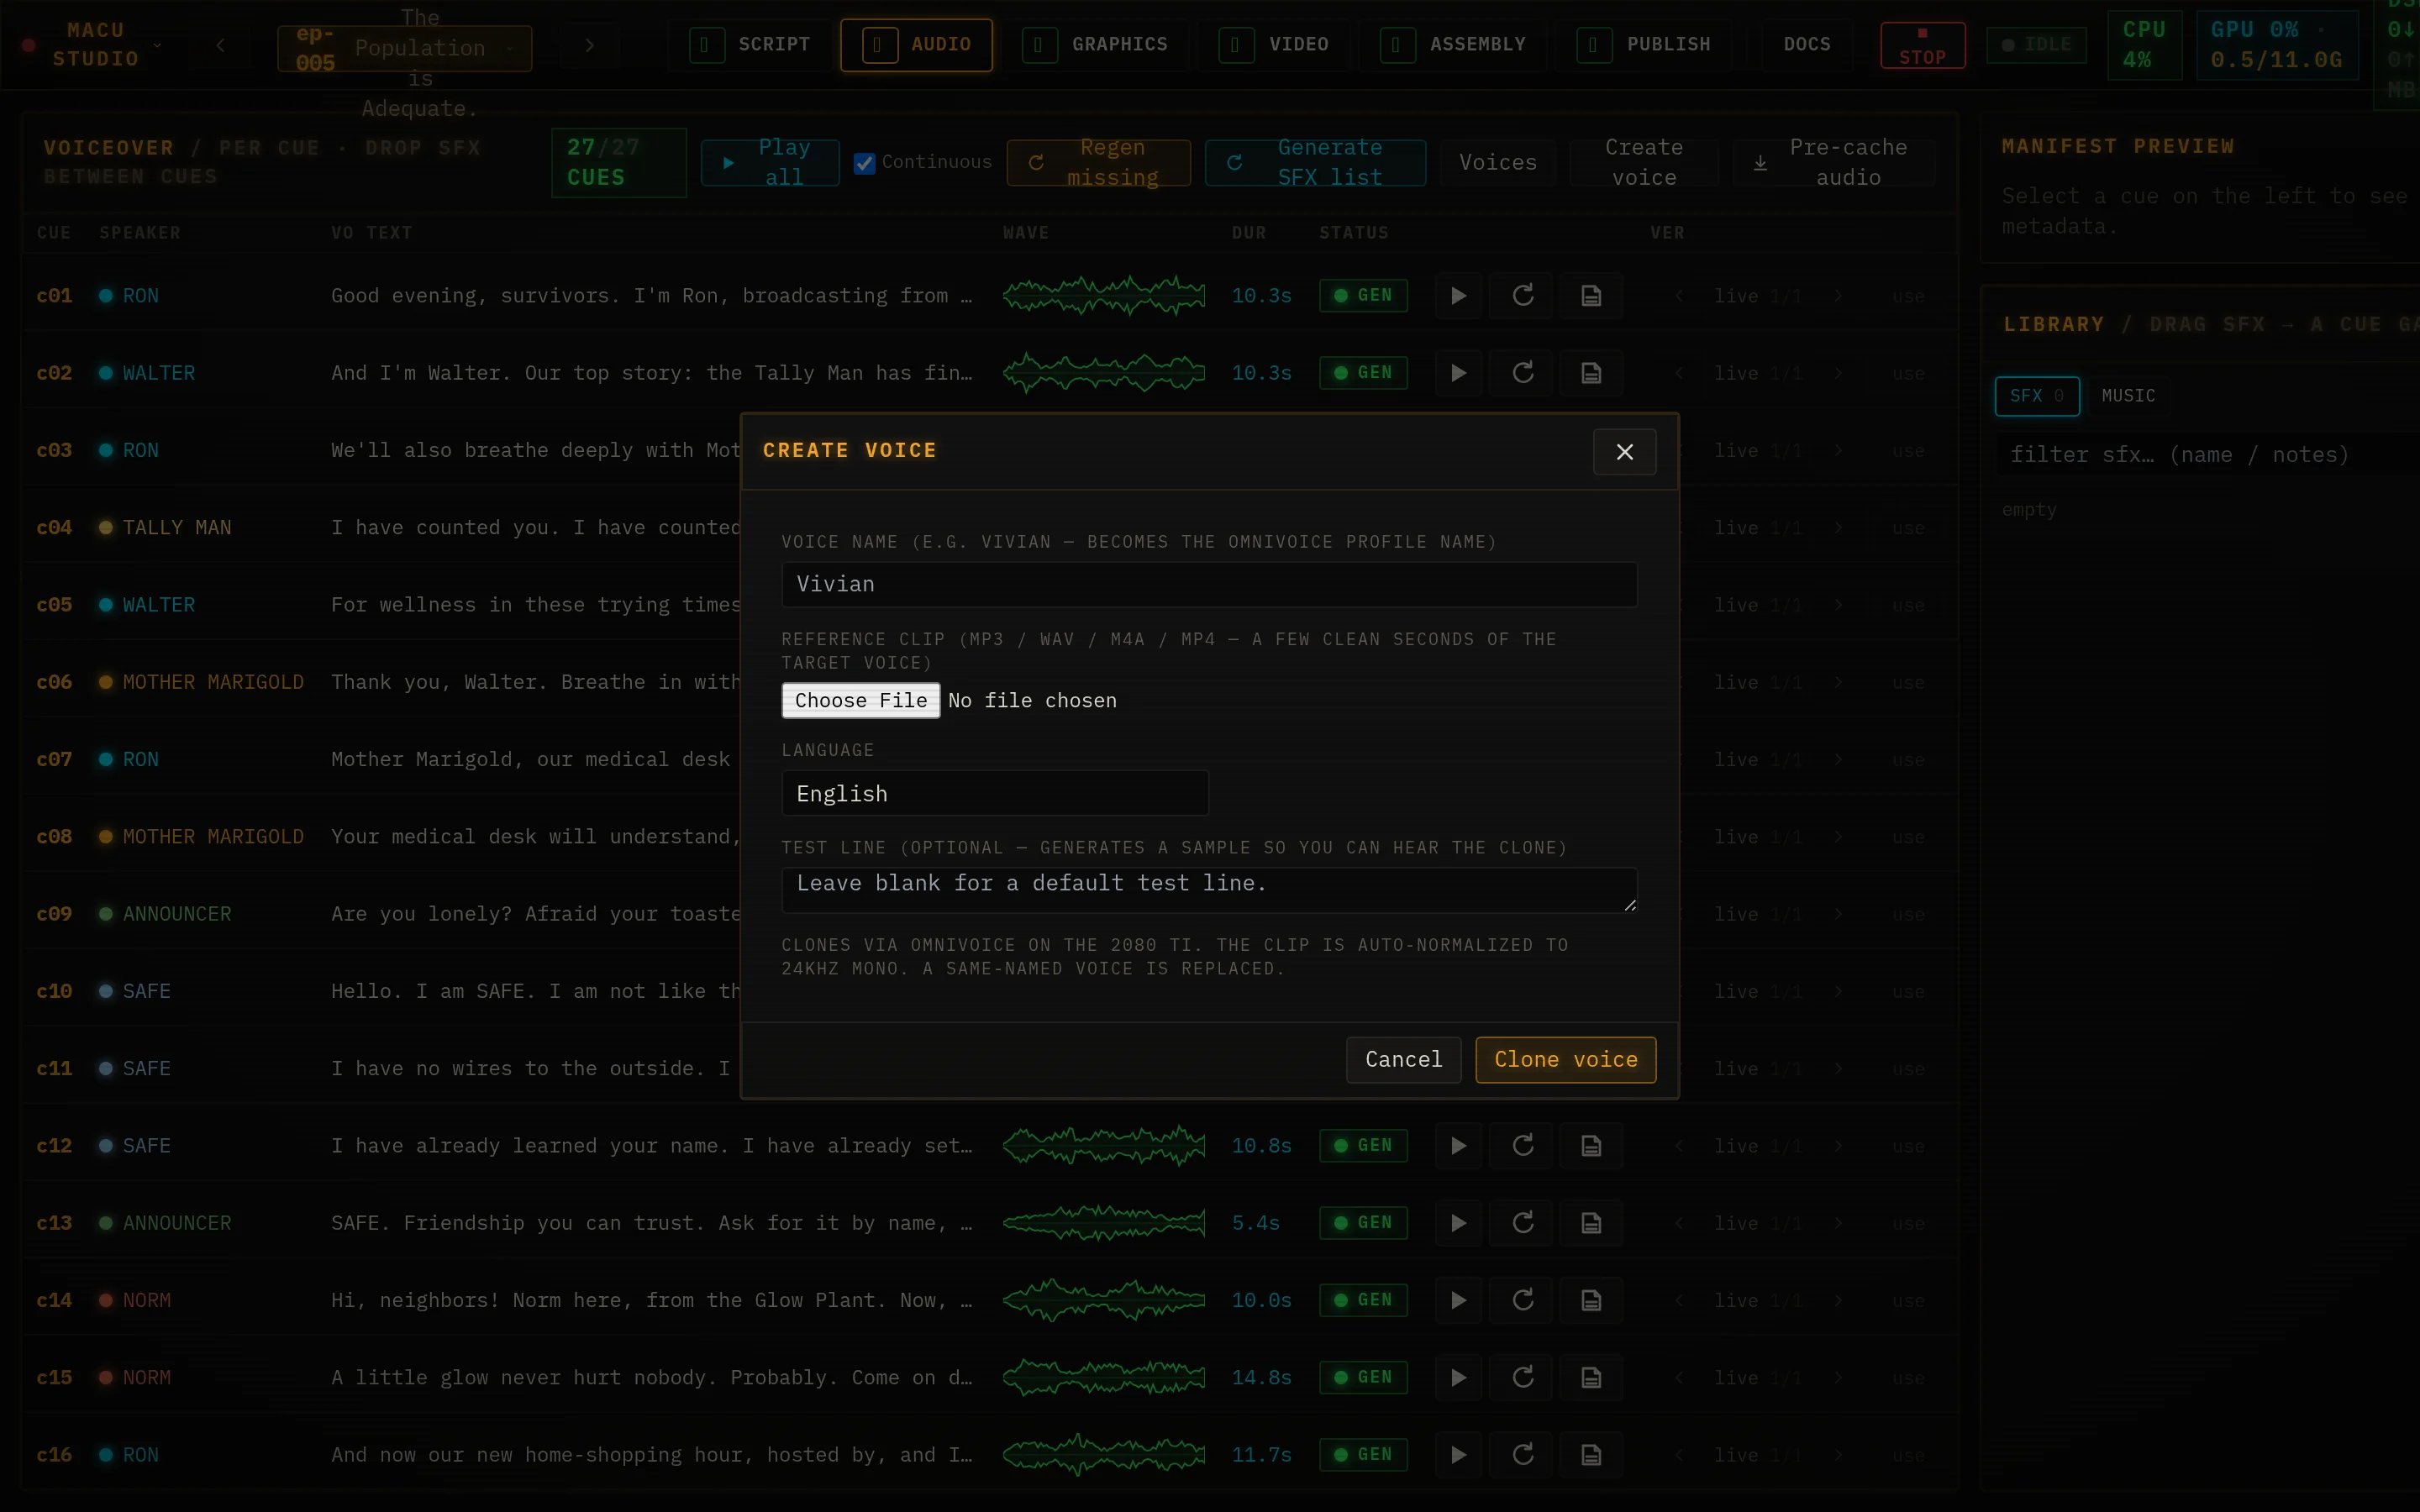
Sound effects and music live here too: drag CC0 effects into the gaps between cues, add a music bed, or let the local model propose an effects list from the script as if it were a radio play.
Graphics
Title cards, lower-thirds, and the YouTube thumbnail - the on-screen text that sells the bit.
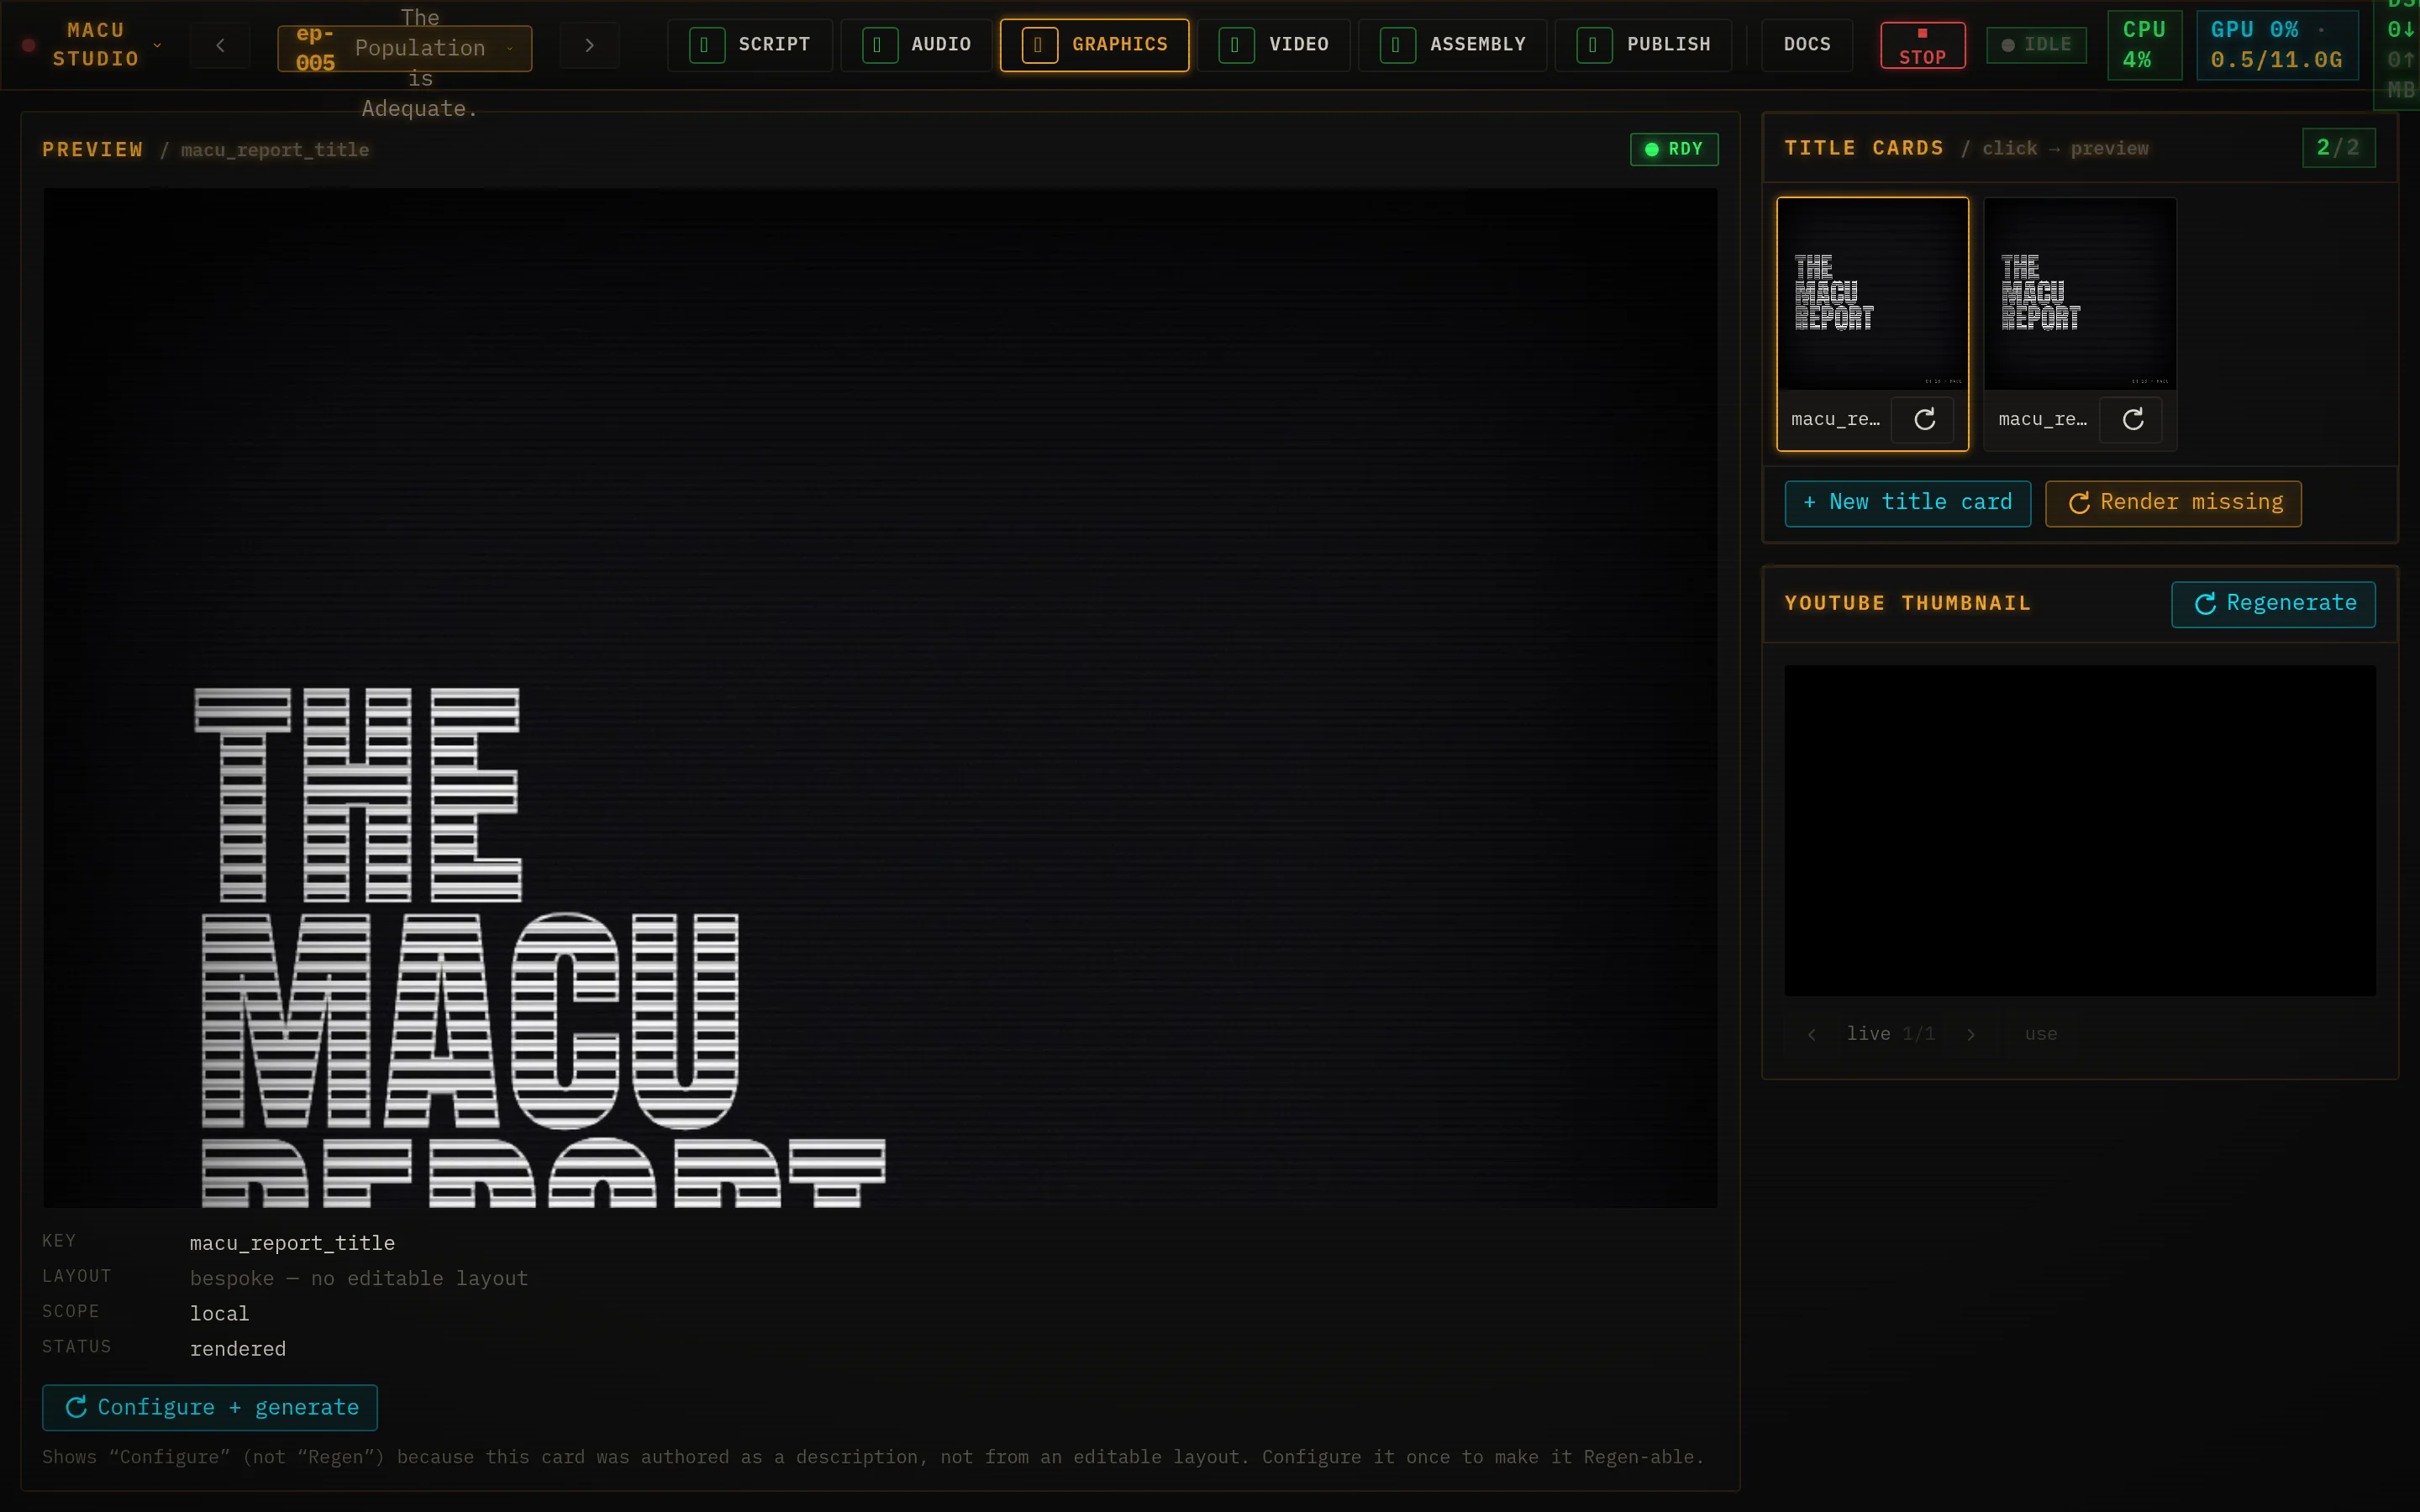
- Click a card to preview it; Regen re-renders from its saved layout, or Edit… to change the words and the layout.
- + New title card walks a three-step wizard: name it, pick a layout (or have the AI design a fresh one from a brief), fill in the text.
- Render missing renders everything that’s new or out of date in one go.
- The YouTube thumbnail panel renders, versions, and lets you promote your favorite - with an optional AI-written hook.
Video
The shot list - every character and b-roll clip the episode needs. Tune the prompts, render the missing ones.
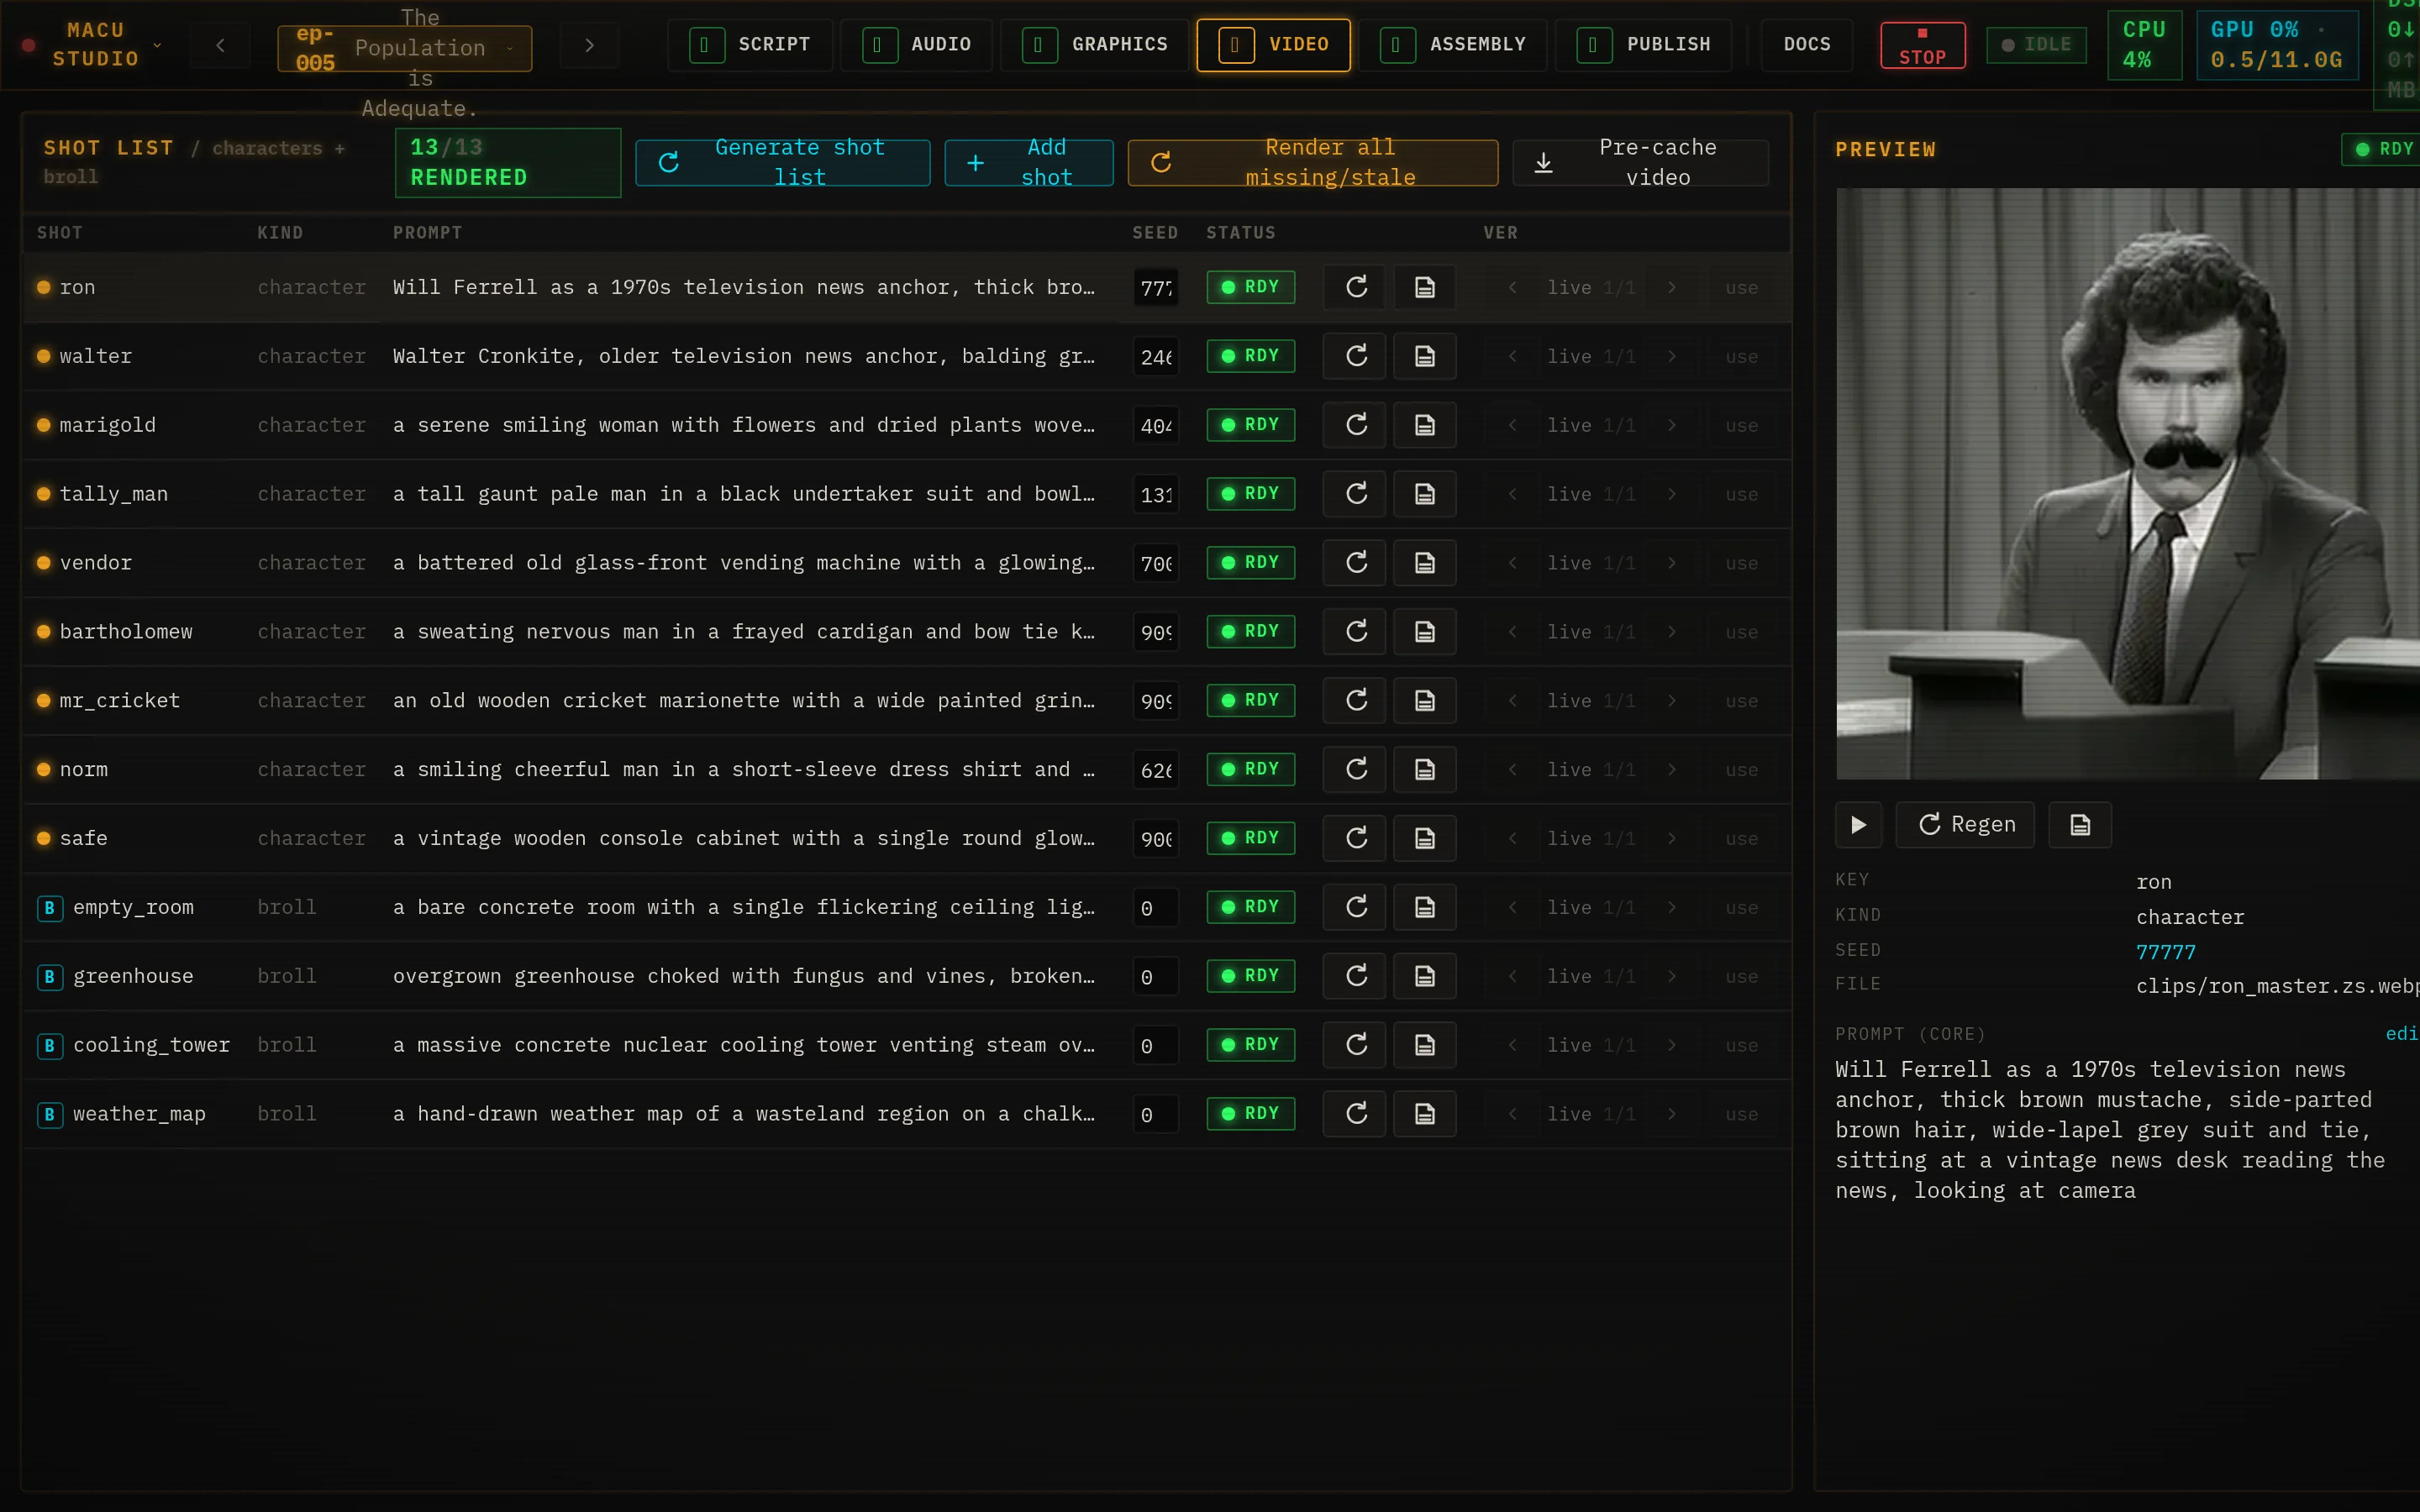
- Edit a shot’s prompt or seed inline and save it to the manifest; Play the rendered master, or Regen a single shot (with notes if you want a specific look).
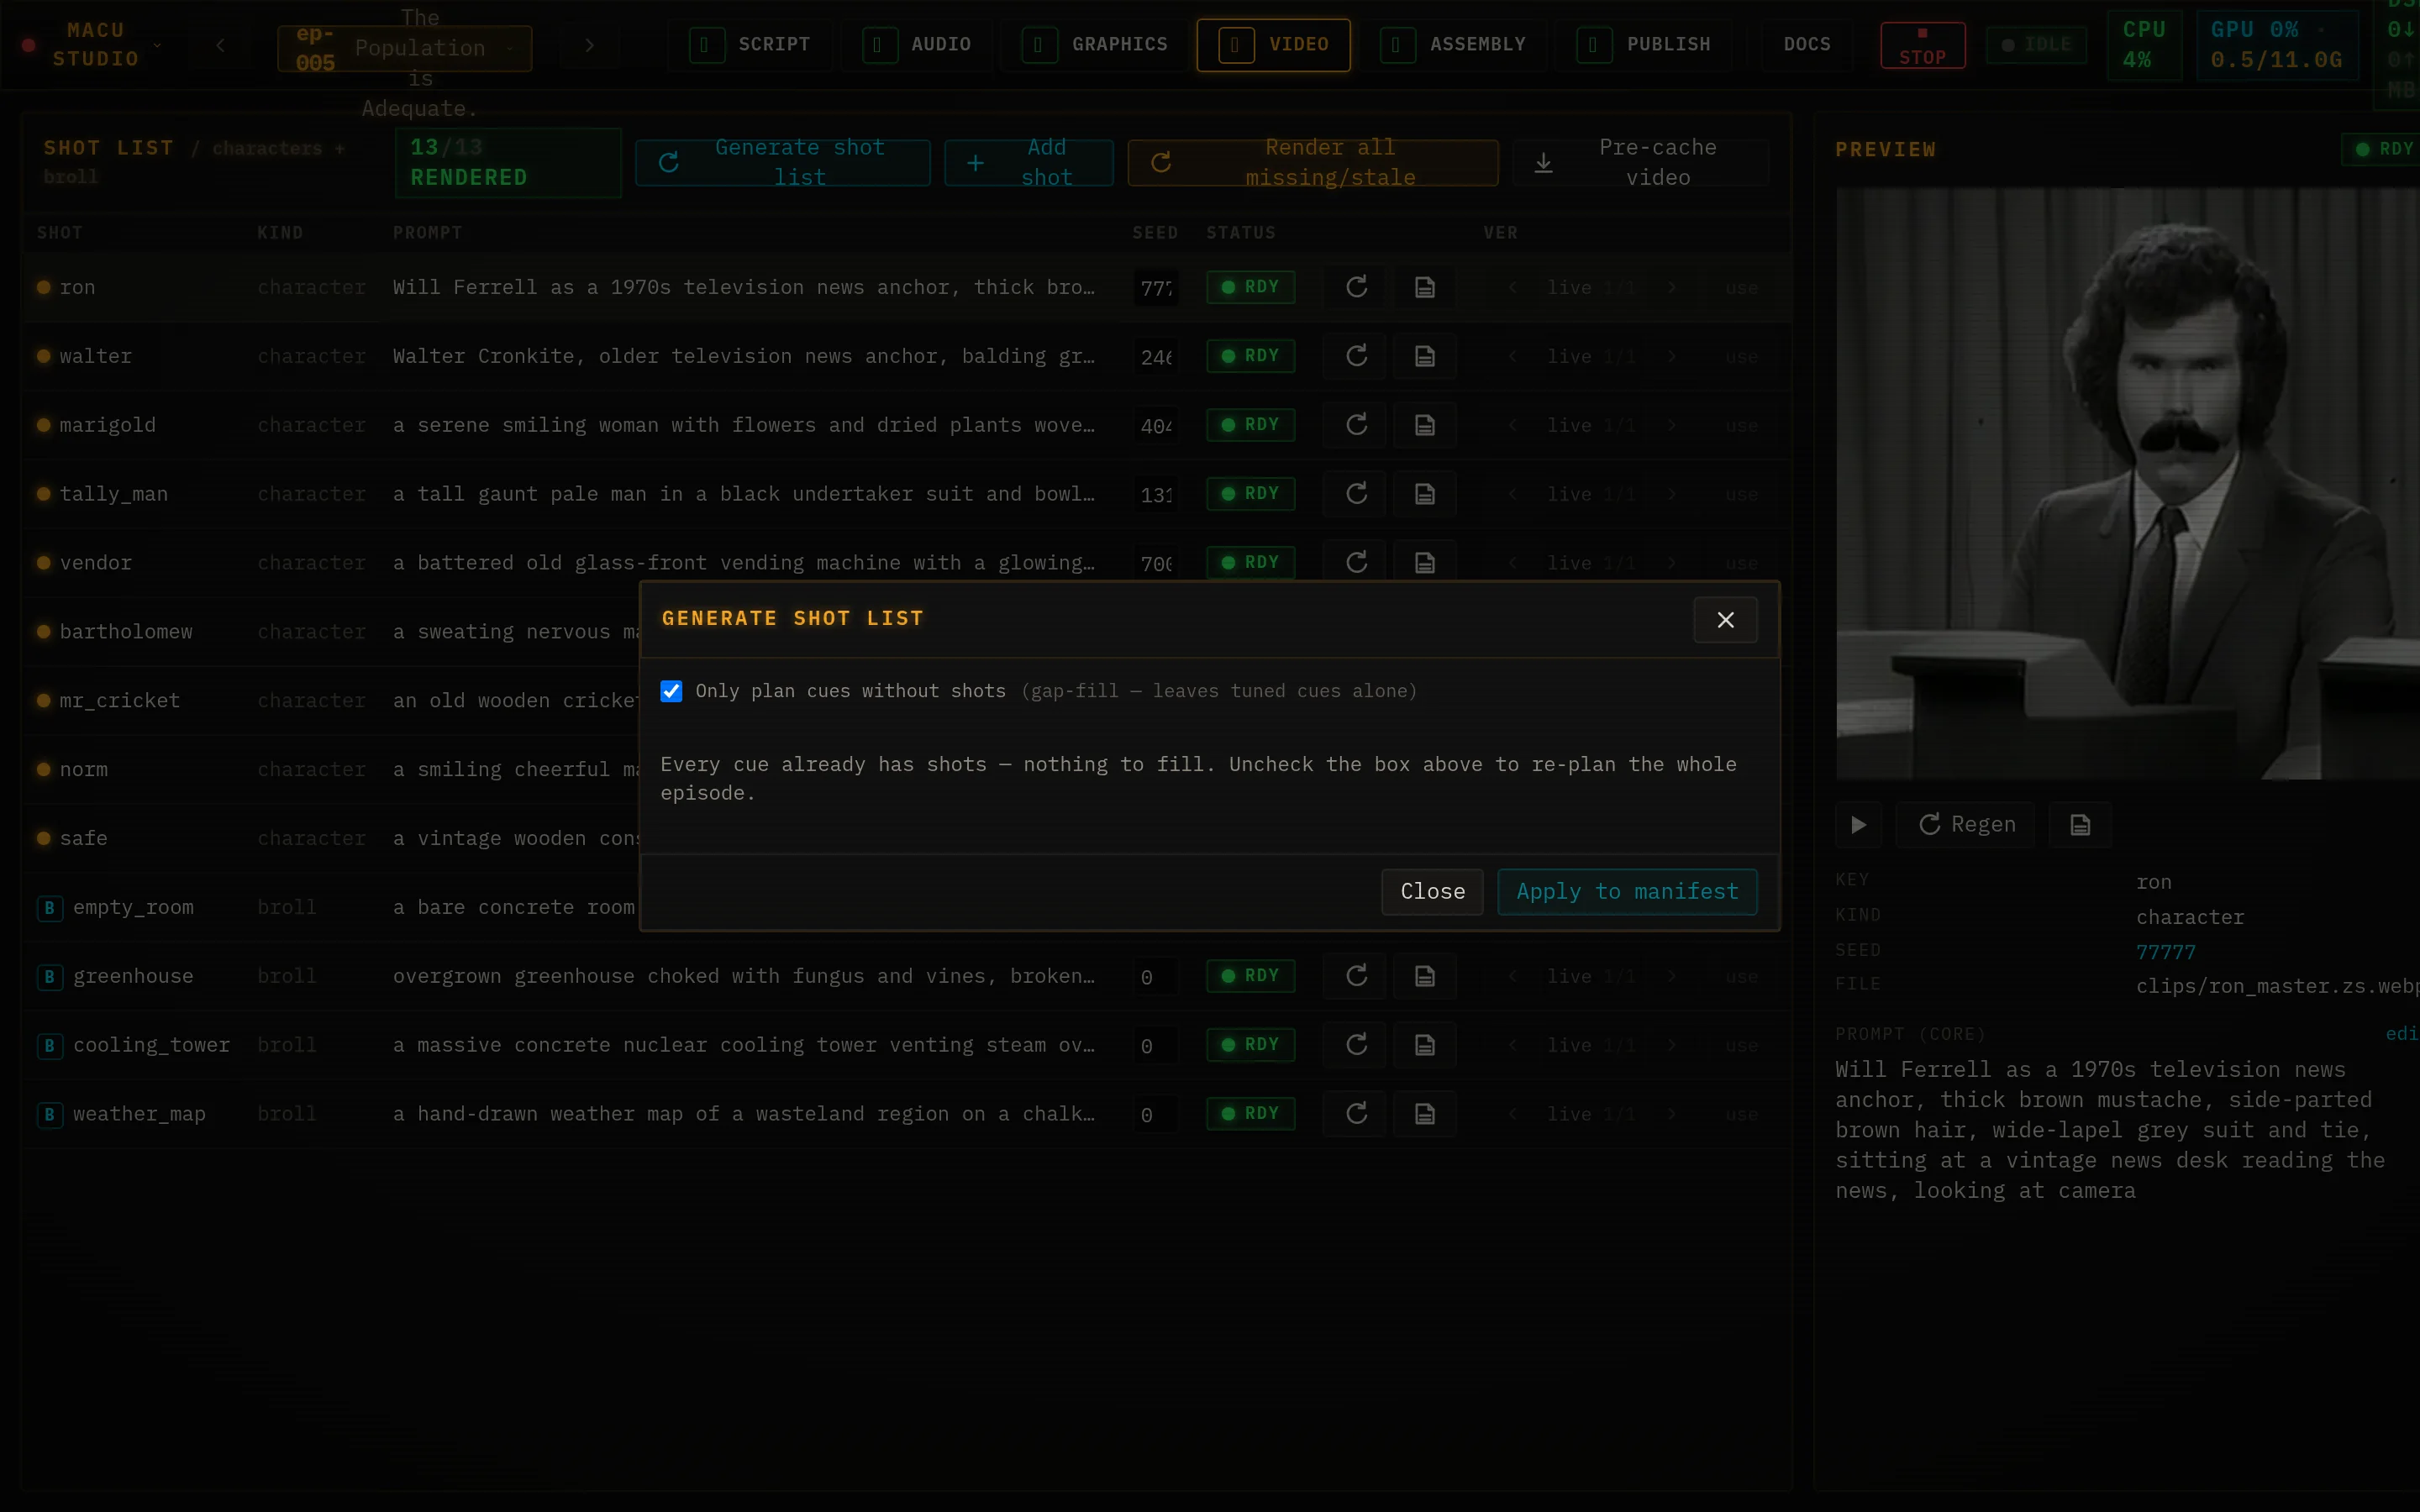
- Generate shot list has the local model plan shots straight from the script and reuse recurring characters.
- Render all missing/stale sends everything that isn’t done to the render queue.
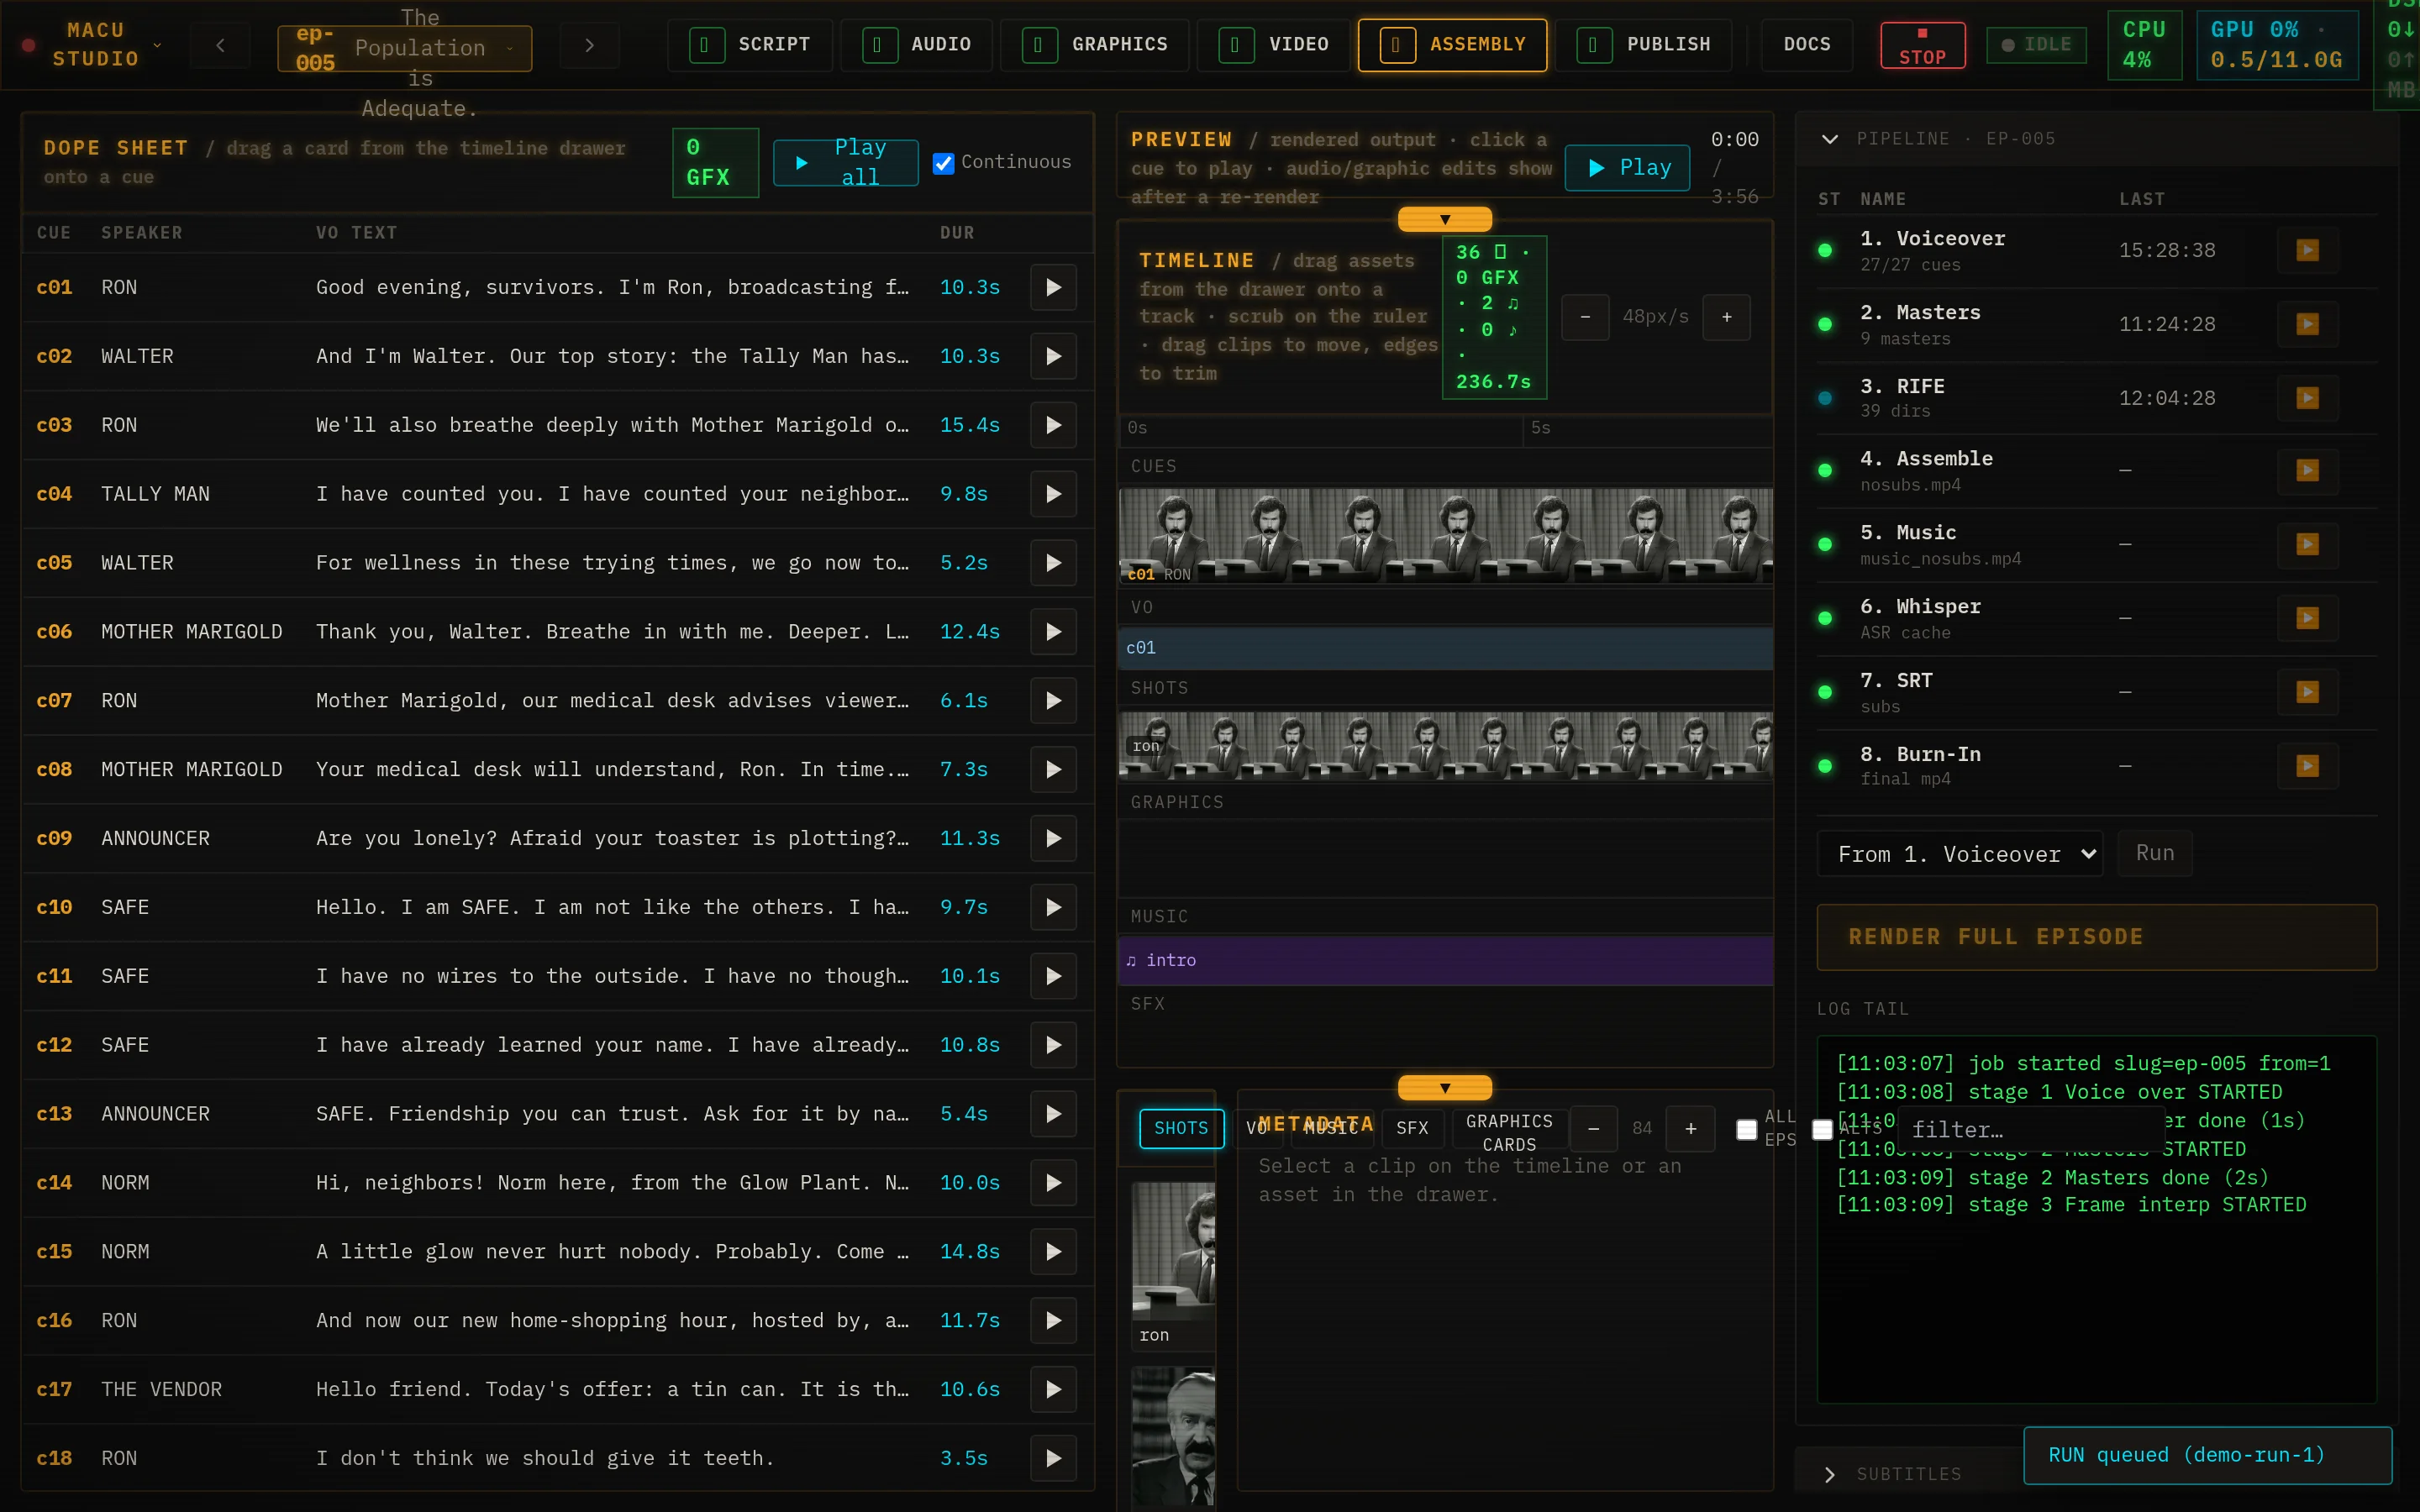
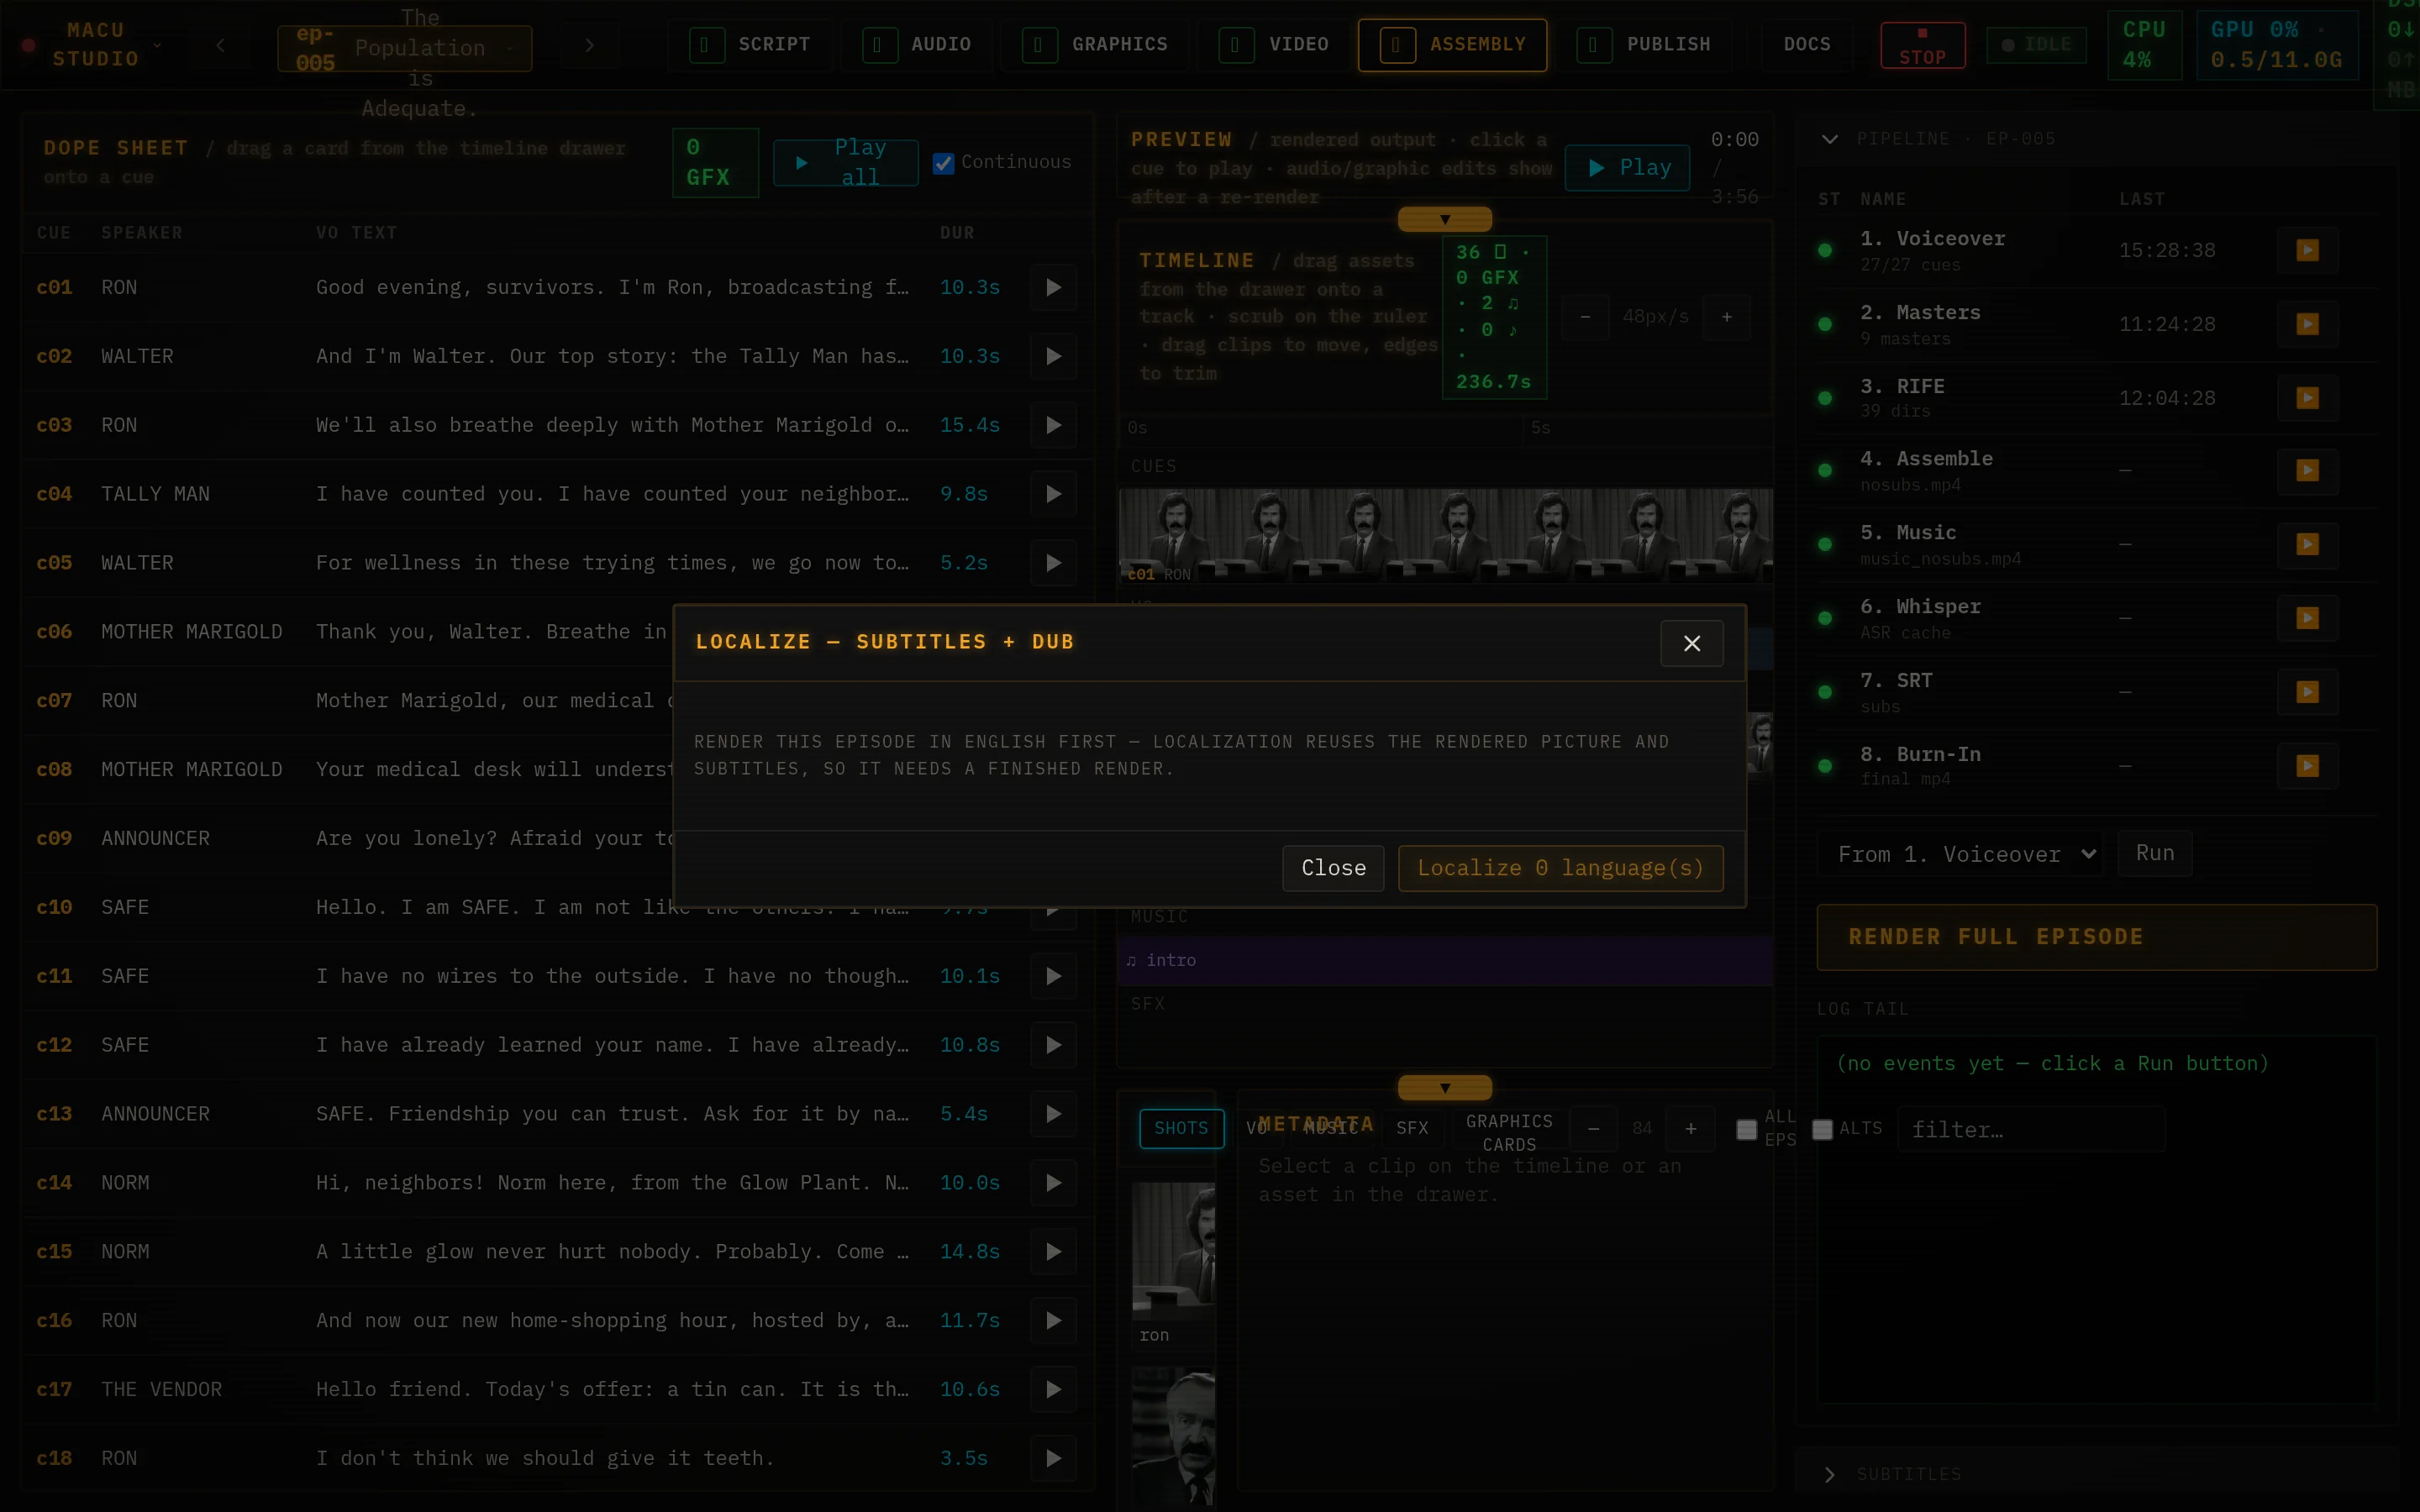
Assembly
The render room. A timeline and dope sheet on the left, and the eight-stage pipeline on the right.

- Hit RENDER FULL EPISODE and watch it build: voiceover → masters → frame-interp → assemble → music → transcription → subtitles → burn-in, with a live log.
- Run from any stage, or re-run a single one with the per-stage ▶.
- The Subtitles panel has an inline SRT editor - click a line, fix it, hit enter - and a Re-burn subs button.
- When it’s done, the Final output player shows the finished video with Download and Localize….
Characters & the cloud
Everything above renders locally on your own GPU - free, no account, nothing leaves your box. Two optional features build on that: a character library so your cast stays on-model, and a cloud connection for people who want bigger video models, or who run the light install without a heavy GPU.
The Characters page
Characters (top bar) is a show-level roster. For each character you generate reference stills- “takes” - and star a favorite as the default. Use a take in an episode and that look feeds the character’s shots, so Ron looks like Ron in every scene. Takes can be made locally (ComfyUI), in the cloud (Higgsfield), or on a remote render box - your pick, per the Engines routing below.
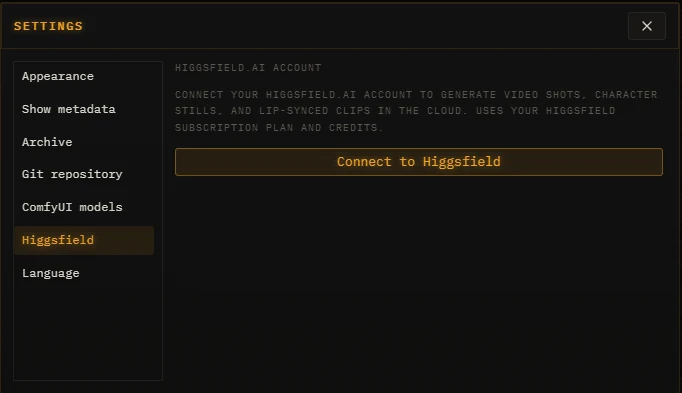
Connect Higgsfield
To generate video shots, character stills, or lip-synced clips in the cloud, connect a Higgsfield.ai account: Project menu → Settings → Higgsfield → Connect to Higgsfield. Sign in on the browser tab that opens and Studio links to your account.
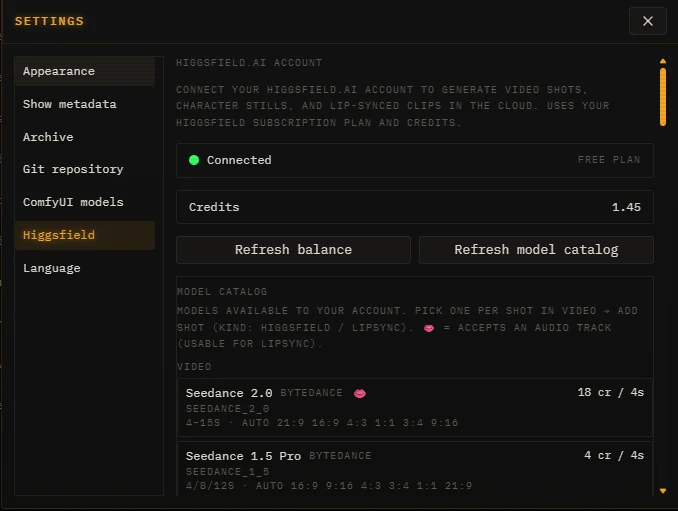
Once connected, the panel shows your plan, your live credit balance, and a model catalog - every video / image / lipsync model your account can use, with its per-shot cost. Refresh balance and Refresh model catalog keep both current.
Engine routing
Settings → Engines is where you choose which service handles each job - episode masters, character stills, cloud video, and lipsync. Local is the default everywhere; flip any row to Higgsfield (or your remote box) when you want it, and a live dot shows whether each endpoint is reachable.
Cloud clips are cached the same way local ones are - you never pay for the same shot twice, and the cost is shown before you commit. Import / Export (below) even carries the paid clips and their caches between machines, so moving a show never re-bills.
Higgsfield Integration
Here’s the part most tools miss. Cloud video services like Higgsfield sell an “unlimited” plan - flat rate, generate all you want - but that unlimited tier only works in their web app. Their API still bills you per generation, plan or no plan. So every tool that drives the cloud through the API quietly burns credits, even while you’re paying for unlimited.
MACU Studio is built to close that gap. It ships a CoWork harvest skill: a browser-capable AI agent - Claude driving a real web browser - connected to Studio over its MCP link. You queue the shots you need; the agent generates them free in the Higgsfield web app under your unlimited plan; and Studio auto-files the finished stills and clips back into your episode, with full provenance. No per-shot credits.
How the loop runs
- Queue - Studio (or another agent) drops “generate this” jobs onto a board, visible on the new CoWork tab.
- Generate free - the CoWork agent claims each job and makes it in the web app, on the unlimited tier - $0.
- Harvest - it reports the result back over MCP and Studio pulls it (free) straight into the right character still or video shot.
The payoff: the convenience of an automated pipeline with the economics of your flat-rate plan. A 57-shot episode that would run to thousands of API credits costs nothing. It’s semi-automated - the agent does the clicking, you keep an eye on the queue - and it’s in the box: the cowork-harvest and higgsfield-web-free-gen skills come with Studio.
Why “semi”? Generation has to run through a real browser session to count as web-app usage - that’s the whole point - so an agent drives the browser rather than an API call. Studio handles everything else: the queue, the hand-off, and filing the results. The caveats and how it works are in the docs.
Ship it
You’ve got a video. Here are the ways out the door:
- Sync (top bar) is one click: it reconciles this show’s text with your web connection both ways, working out on its own what to push and what to pull. Your generated media stays local; the text is the portable source of truth.
- Publish to MACU Web (Project menu) wires Studio to this site with a connect token, then pushes your episodes - checked ones go public, unchecked ride along as hidden drafts.
- Import / Export (Project menu) moves a whole show or a single episode between machines as a zip - the text plus the heavy bits Sync leaves behind: voice clips, the character library, episode stills, and paid Higgsfield clips (caches included, so nothing re-bills).
- Localize… (Assembly) makes dubbed videos and translated subtitles in 48 languages, reusing the picture you already rendered - translation is built in and runs locally.
The YouTube tab matches your episodes to their uploads and pushes localized caption tracks. (Uploading the video itself is a separate step.)
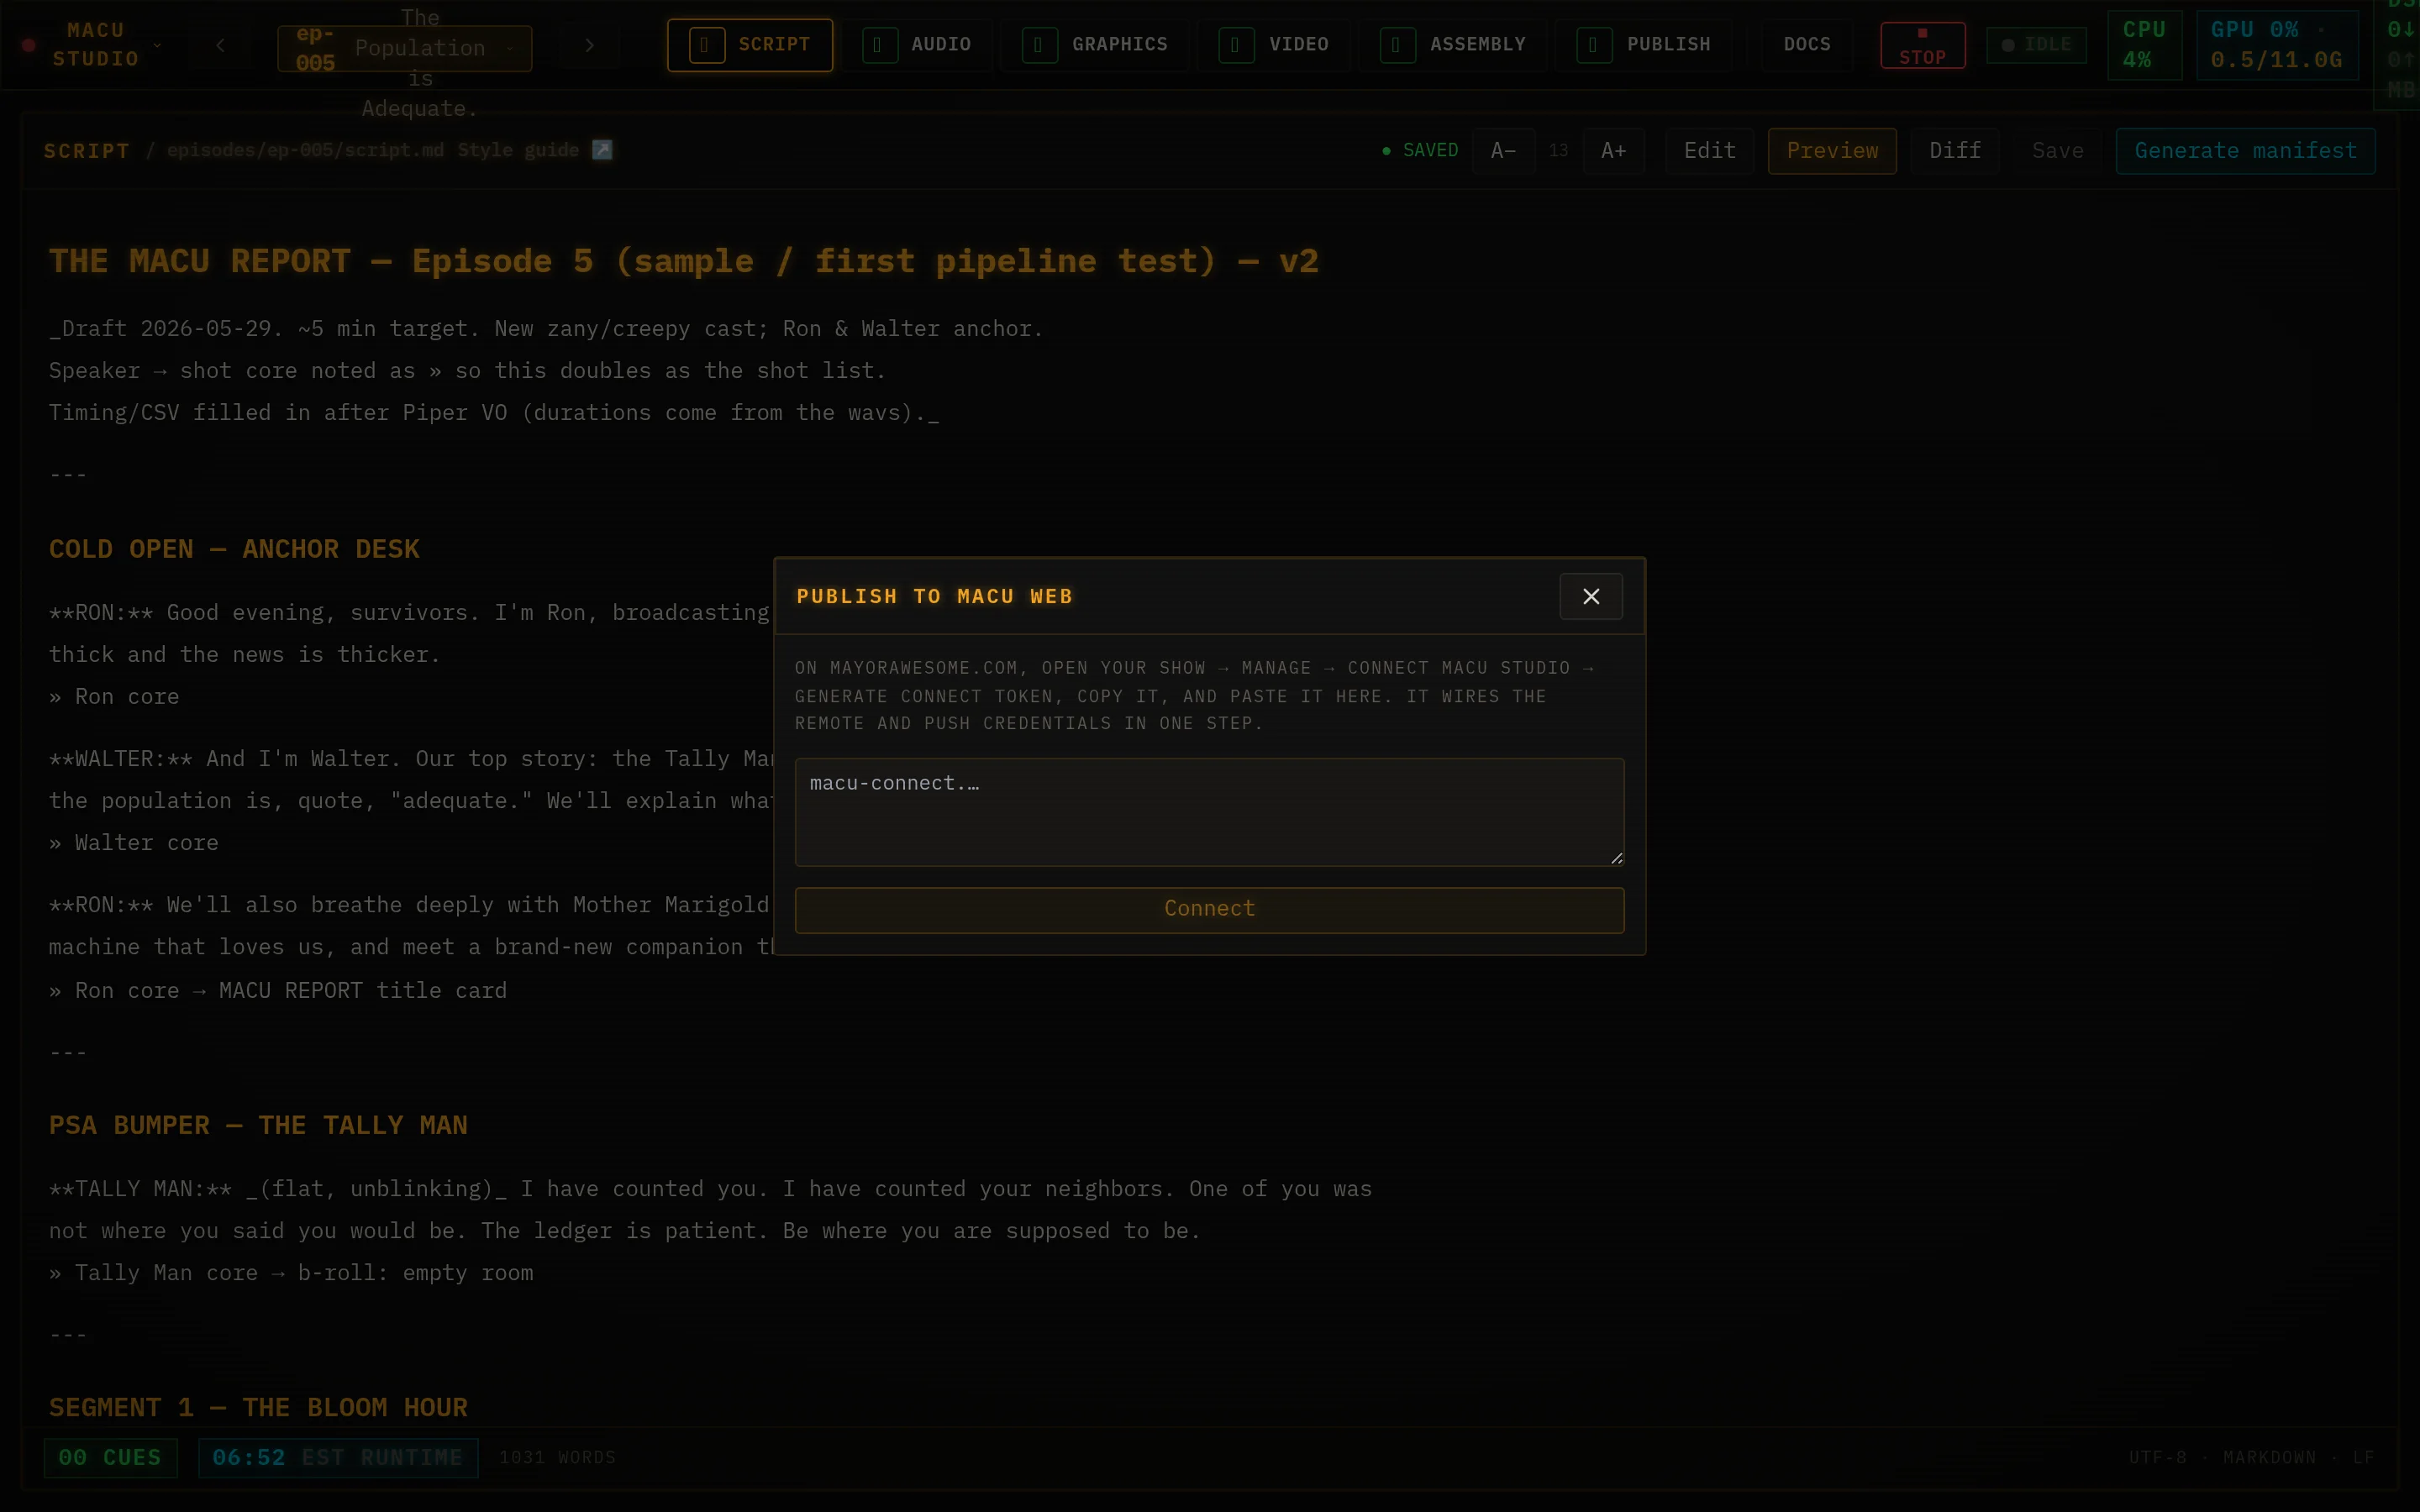
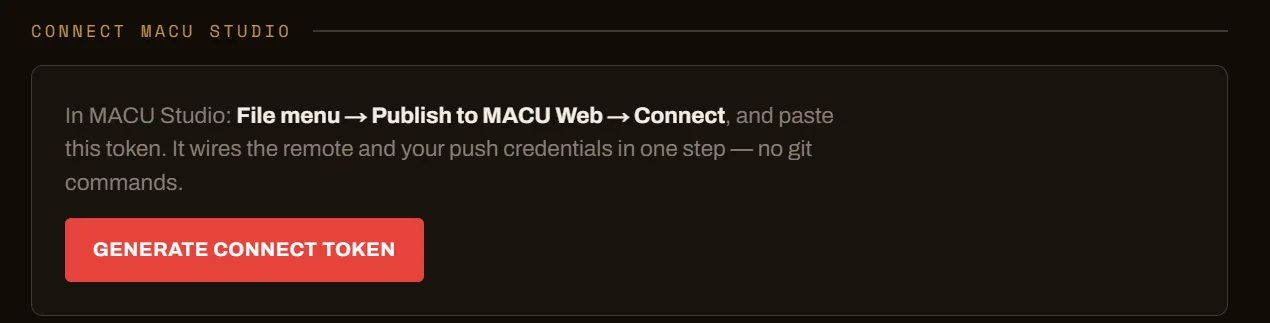
Connect Studio to the web
Publish to MACU Webpushes an episode’s text - title, description, script, the YouTube video id - to your show’s page on this site. Video isn’t hosted here; the page embeds your YouTube upload (and uses its thumbnail), so “publishing” is just syncing the words and the link. You connect once with a token, then it’s one click.
One-time connect
- On mayorawesome.com, open your show and click Manage. In the Connect MACU Studio card, click Generate connect token and Copyit. (It’s one-time - it won’t be shown again. You can revoke it later from your account.)
- In Studio, go to the Publish tab (stage 6). Paste the token into the connect box and click Connect. Already connected to a different site? Click Change connectionfirst to reveal the box.
Publish an episode
- On the Publish tab, set the title, description, and the hosted video URL/id (paste a YouTube link - the id is extracted for you).
- Choose the episode’s visibility: Public (listed), Unlisted (reachable by link), or Hidden (kept in Studio, not shown on the web).
- Click Publish. Studio pushes the text and the site re-reads it - your episode page updates with the new title, description, and embedded video. The thumbnail follows the video id.
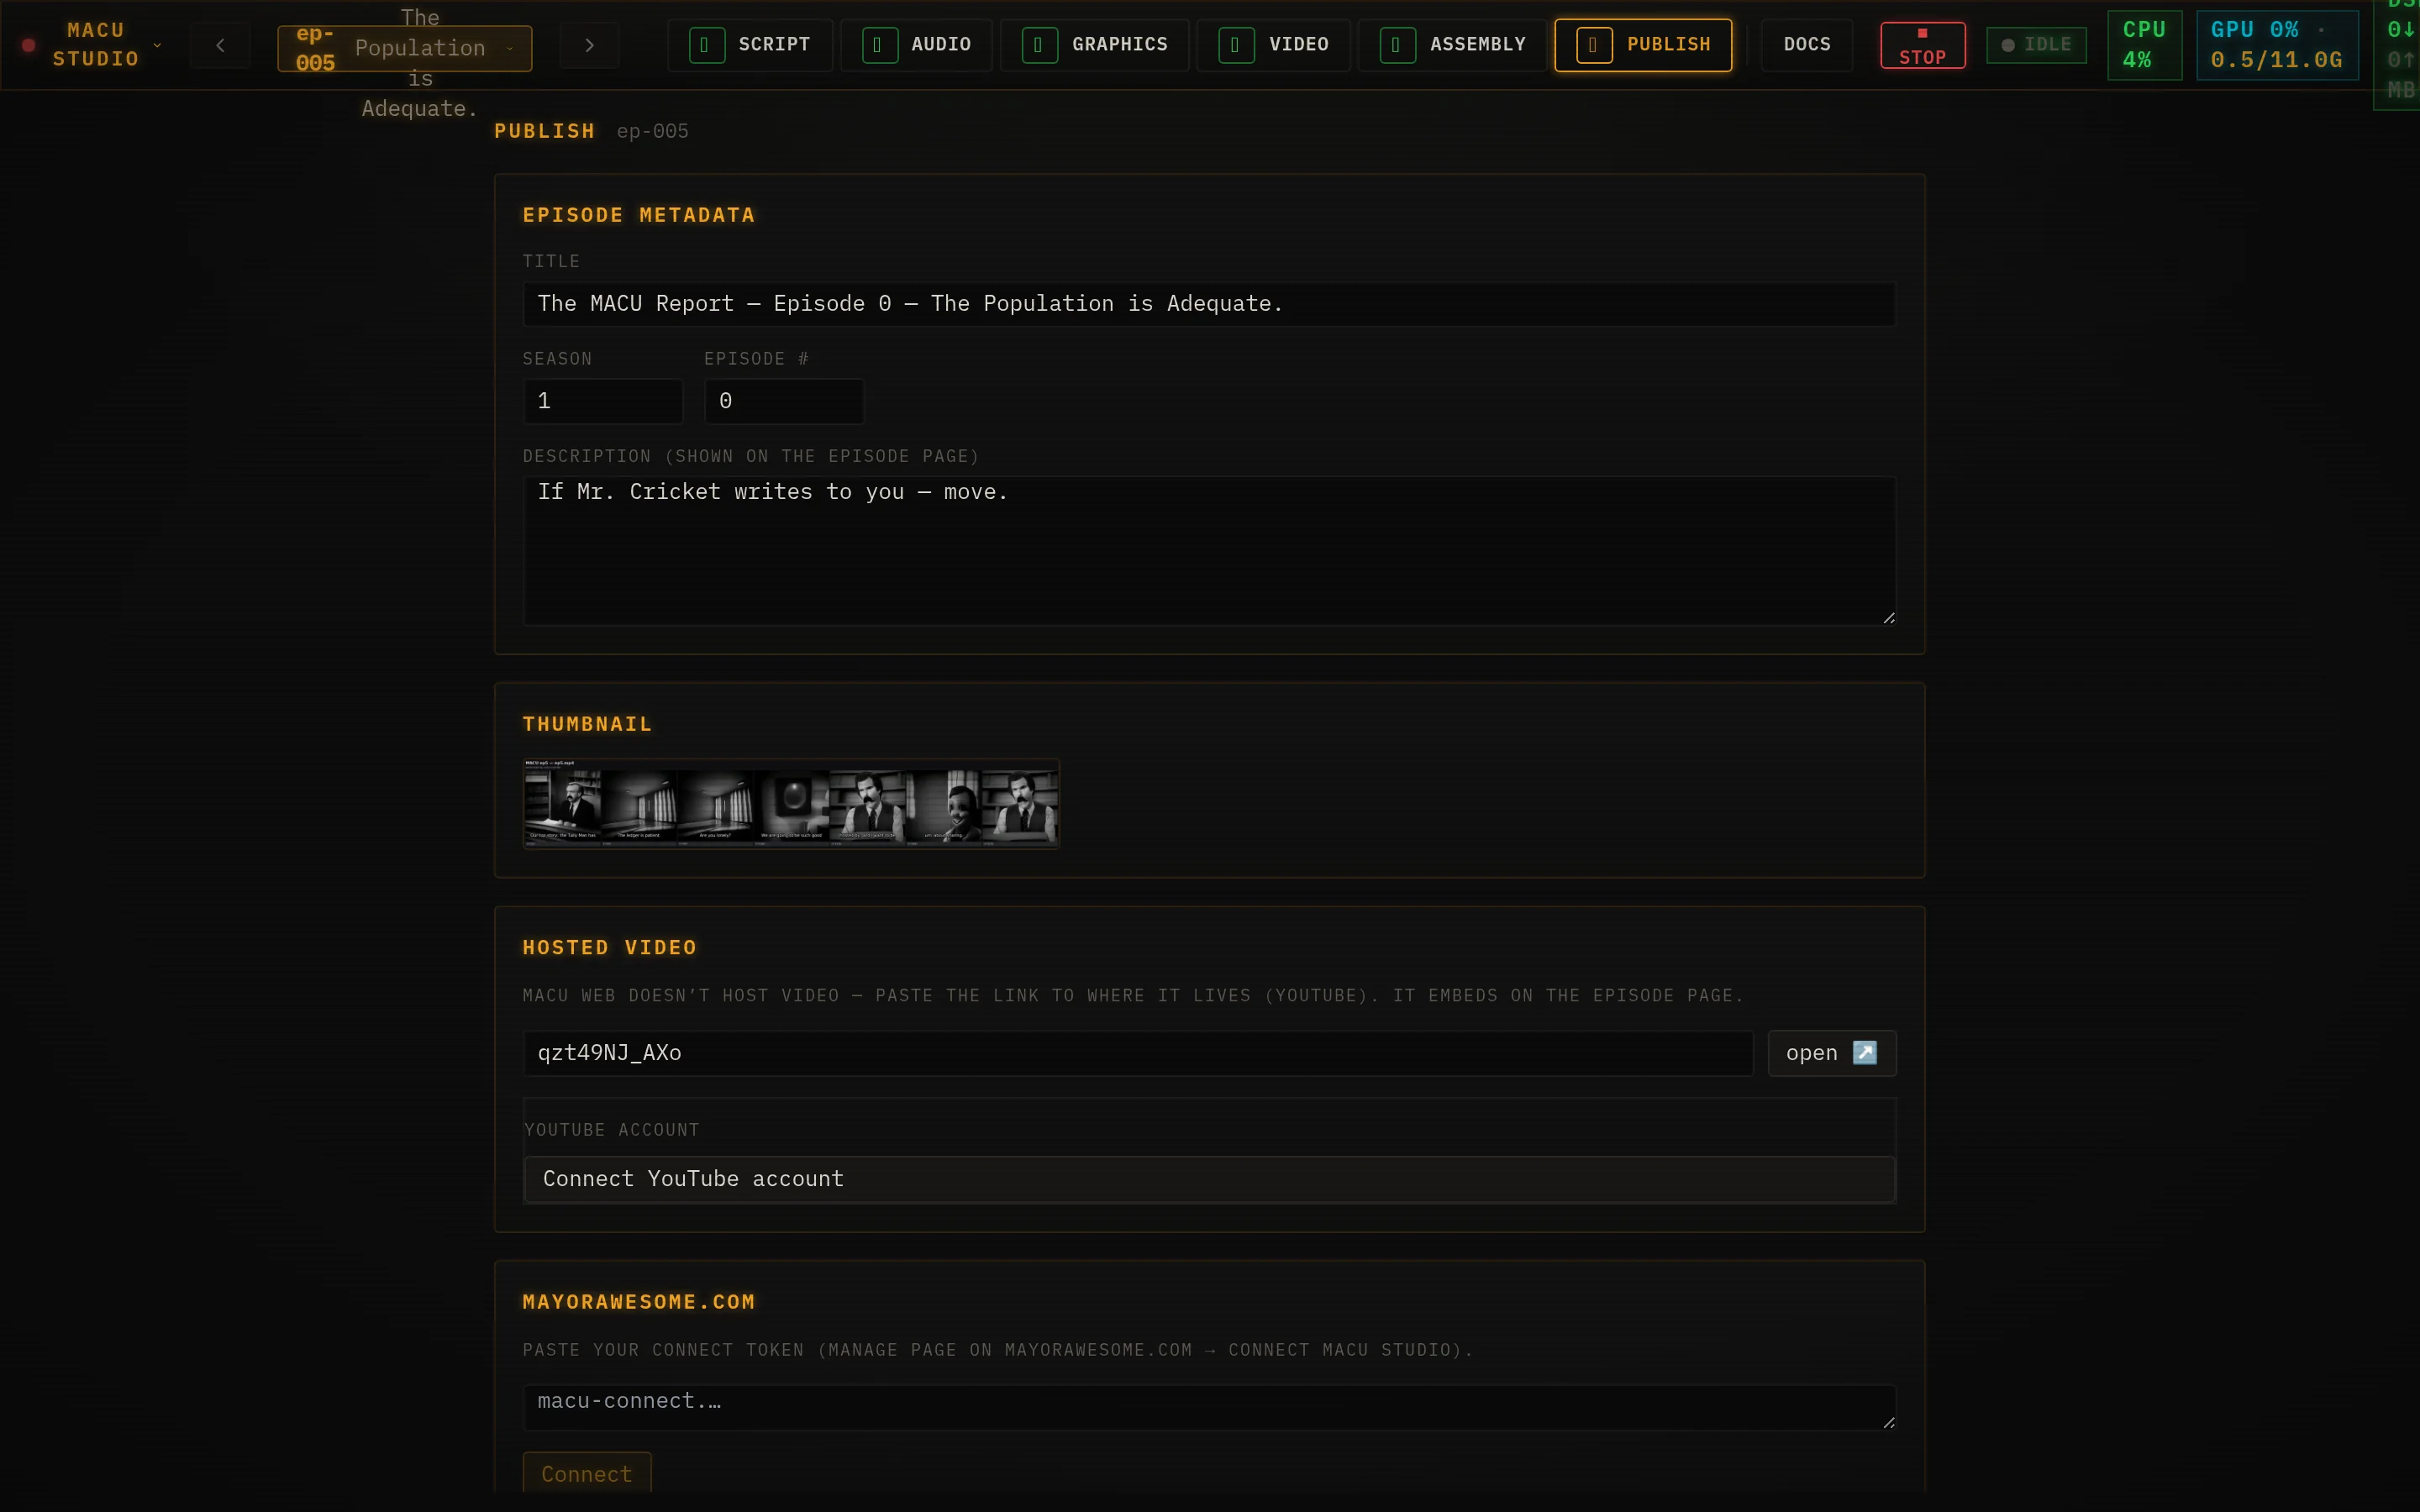
Visibility is owned by the web after the first publish, so hides you make on the site stick even if you republish. Change it any time from the show’s Manage page.
Themes
Studio ships with eleven looks. Project menu → Settings → Theme opens the picker: the classic amber terminal lives on the Terminal row - click a color dot to swap its accent (amber, green, cyan, magenta, or mono) - and below it are six full themes that restyle every surface, font, and corner of the app: Starship, Wasteland, Slate Pro, Movie Palace, Dracula, and Pretty Princess (the lone light theme).
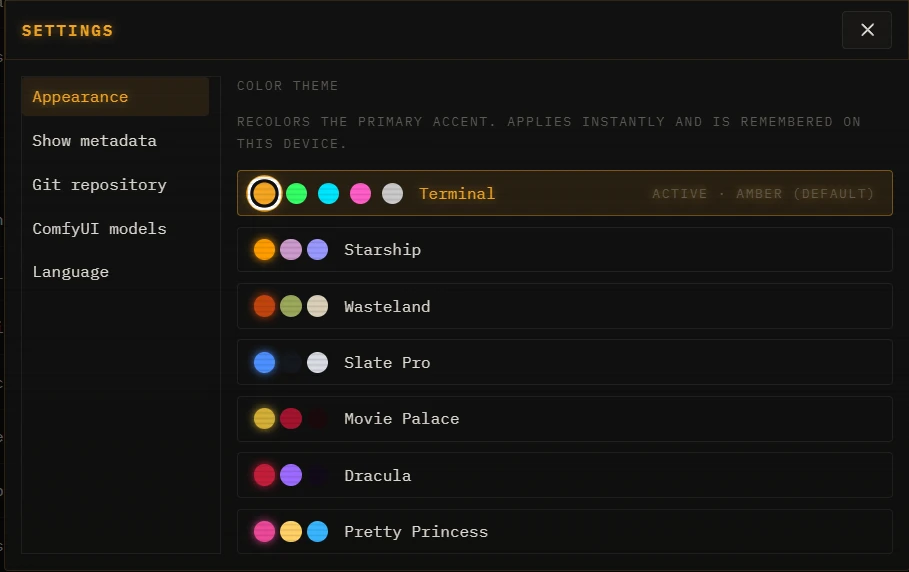
- Switching is instant - no reload - and remembered per browser.
- Append
?theme=dracula(any theme id) to the Studio URL to preview a look without saving it;?settings=1deep-links straight into the picker. - Tables, timelines, and the script editor stay monospace in every theme, so dense data stays legible no matter how velvety the chrome gets.
A few handy bits
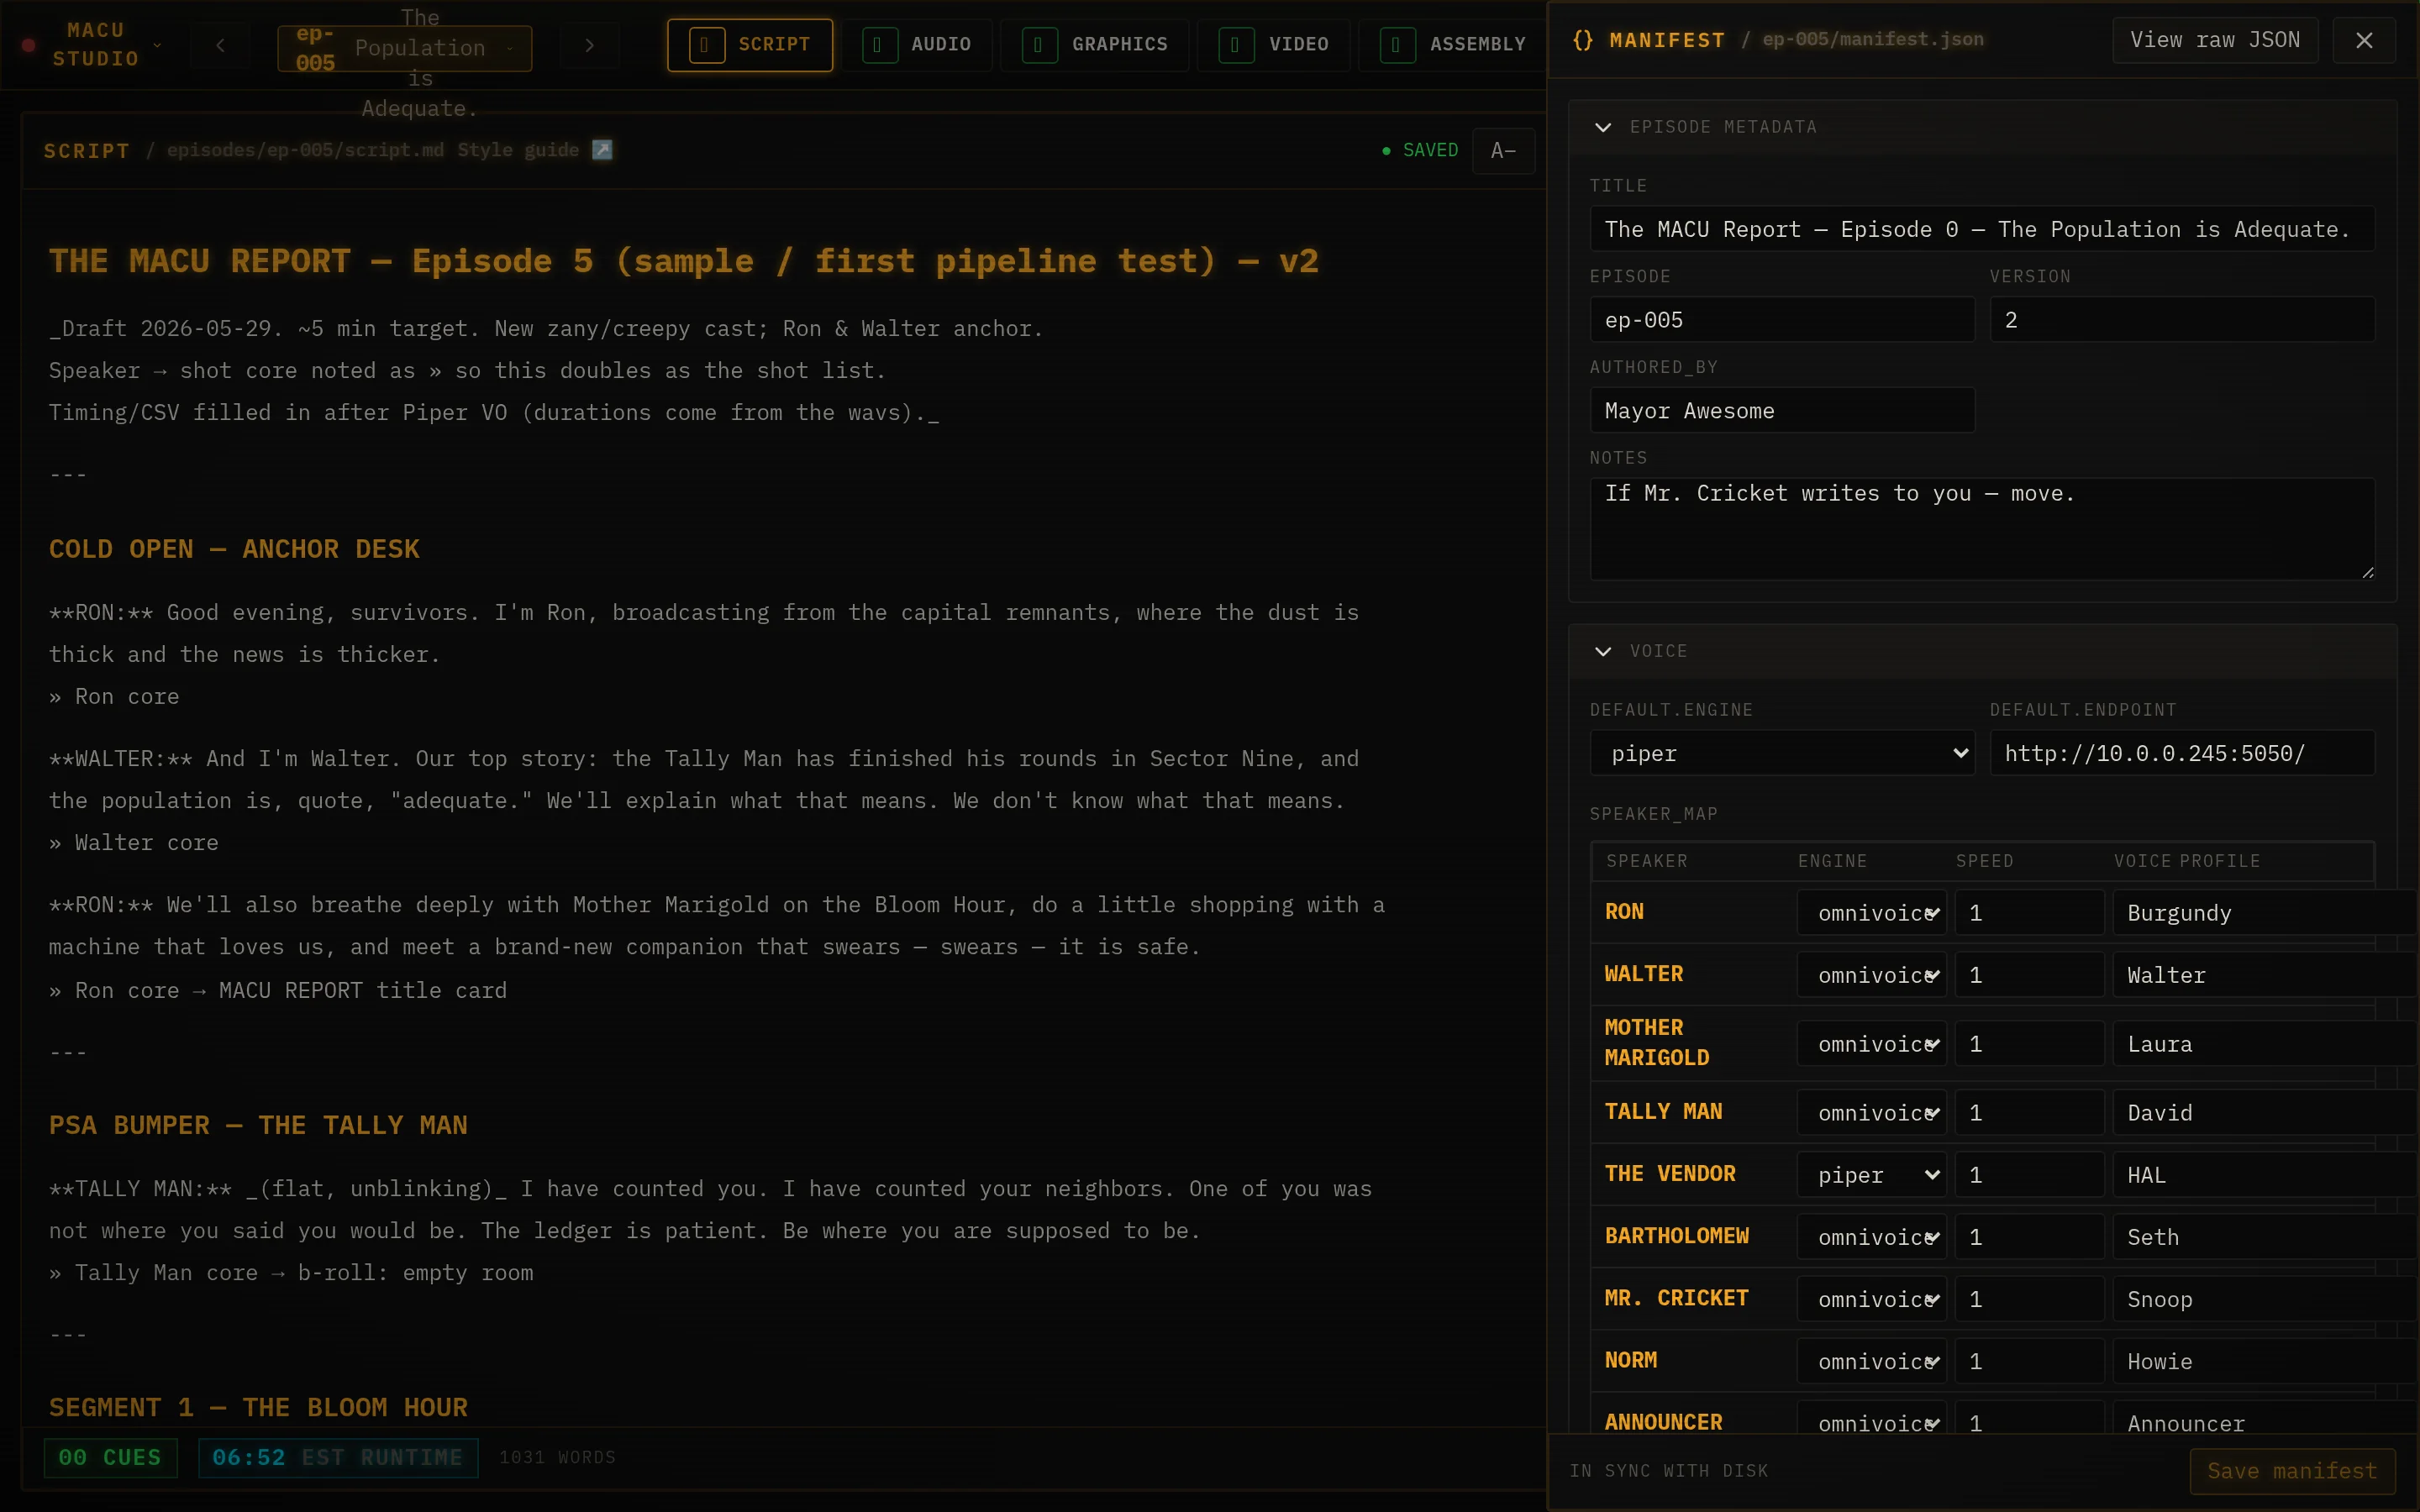
- Everything autosaves. Edits to the script, manifest, and SRT write as you go.
- The manifest drawer (braces icon, top right) is the power-user escape hatch - every setting in a form, with a raw-JSON toggle.
- Stuck a render? The red ■ Stop button kills the active job and frees the GPU.
- The Docs tab keeps your canon - character bible, prompt notes - one click away while you work.
- Studio speaks MCP. Every step on this page is also a tool an AI agent can call at
http://localhost:8774/mcp- point Claude Code or Claude Desktop at it and direct the show in plain language. See Connect an agent. - Lost? Project menu → Tutorial re-runs the guided tour any time.
Install MACU Studio
Studio is free and open source - it runs on your machine, on your GPU. The demo above is the real app with a fake backend; this is how you get the real backend too.
- An NVIDIA CUDA GPU - Turing (RTX 20-series) or newer; ~11-12 GB VRAM recommended (it’s GPU-bound - that’s the real limit). No AMD/Intel/Apple GPU.
- Linux, or Windows via WSL2 (not macOS - no CUDA). 32 GB RAM and ~100 GB of SSD are comfortable.
- Docker + the nvidia-container-toolkit, Node 20+, Python 3.11+, git, ffmpeg. The installer can pull missing prerequisites.
Then it’s three commands:
git clone https://github.com/AugustWasilowski/macu-studio
cd macu-studio
./deploy/install.sh        # doctor → pull GPU images → fetch models (~8 GB) → build
./deploy/start-studio.sh # then open http://localhost:8774deploy/doctor.shchecks your hardware first and warns if your VRAM is low. Full prerequisites and the staged install live in the repo’s INSTALL.md.